cloudflare · · 16 min read
Practical Notes on Integrating a Cloudflare OAuth Client
I recently connected a third-party app to Cloudflare's OAuth Client. These are my notes from creating the client through a working authorization-code flow.
 Mttao @bearboy80 3,417 words 中文 →
I recently connected a third-party app to Cloudflare’s OAuth Client and found that the dashboard fields are not a “fill them in and you are done” form. Pick the wrong client type, miss a slash on redirect_uri, or promote a client from private to public too early, and later errors point somewhere else.
What this solves: your app calls the Cloudflare API as the user, instead of stuffing a long-lived API token into the client. After the user consents on dash.cloudflare.com, you get an access token, and a refresh token if you need to renew it, then use those to reach Workers, account, analytics, and similar APIs.
This is not a “Sign in with Cloudflare” button for your product. Identity scopes such as openid, profile, and email can return profile data, but the consent screen is really asking what this app can do to which Cloudflare resources. Consent grants account permissions. It does not make Cloudflare your IdP.
The official docs are explicit: third-party clients support Authorization Code only. There is no Client Credentials, Implicit, Resource Owner Password, or Device Authorization. There is no second path that skips the browser.
The endpoints all sit under dash.cloudflare.com:
| Purpose | URL |
|---|---|
| OpenID configuration | https://dash.cloudflare.com/.well-known/openid-configuration |
| JWKS | https://dash.cloudflare.com/.well-known/jwks.json |
| Authorization | https://dash.cloudflare.com/oauth2/auth |
| Token | https://dash.cloudflare.com/oauth2/token |
| Revocation | https://dash.cloudflare.com/oauth2/revoke |
| Logout | https://dash.cloudflare.com/oauth2/logout |
| User info | https://dash.cloudflare.com/oauth2/userinfo |
The rest of this note follows the integration order: pick the client type, fix the create-form fields, walk the authorization-code flow, then cover native apps and common pitfalls on their own.
Pick the right client type
The create form has a Token Authentication Method field. It decides how your app proves it is this client when it exchanges a token. There are two common choices.
A confidential client has a client_secret. When it posts to /oauth2/token, it sends the authorization code and that secret. In the dashboard those options are client_secret_basic and client_secret_post. The only difference is whether the secret goes in HTTP Basic or in a form field. The secret has to stay on a server. Users must not see it or take it with them.
A public client has no secret. The dashboard option is None (PKCE). Installers and front-end code can be opened, so shipping a fixed secret is the same as publishing it. PKCE replaces that: each login generates a random code_verifier, the authorization request sends only the derived code_challenge, and the token request presents the original verifier. Cloudflare requires the challenge method to be S256.
Once you match that to your app, the choice is clear:
| Your app | Client type | Token Authentication Method | PKCE |
|---|---|---|---|
| Server-side web / backend | Confidential | client_secret_basic or client_secret_post | Optional |
| SPA, mobile, desktop, CLI | Public | None (PKCE) | Required, and it must be S256 |
A client_secret is created only if you pick client_secret_basic or client_secret_post. After create, it is shown once. Leave the page and you cannot see it again. Lose it and you have to rotate. Keep that secret on the server, in an environment variable or a secrets manager. Do not send it to the browser.
SPA, mobile, desktop, and CLI apps should not pick those two options. Keep None (PKCE). Then you do not need to configure a client_secret.
Fields that matter when you create a client
In the dashboard: select the account → Manage Account → OAuth clients → Create client. The Cloudflare account needs Super Administrator, Administrator, or OAuth Client Write. You can also use the API: POST /accounts/{account_id}/oauth_clients. That token needs OAuth Clients Write.
After Create client, the page title is Configure OAuth client. The three steps on the right are Configure OAuth client, then Select permission scopes, then Choose optional scopes. Under the title the page says:
All clients are considered private and cannot be made public until the required fields are filled. Some optional fields are required for public clients.
New clients default to private. They cannot become public until the required fields are filled. Fields marked optional on this page can stay empty while the client is private. To promote it later, the official docs require Client name, Logo, Client URL, and Scopes, plus domain verification for the Client URL.
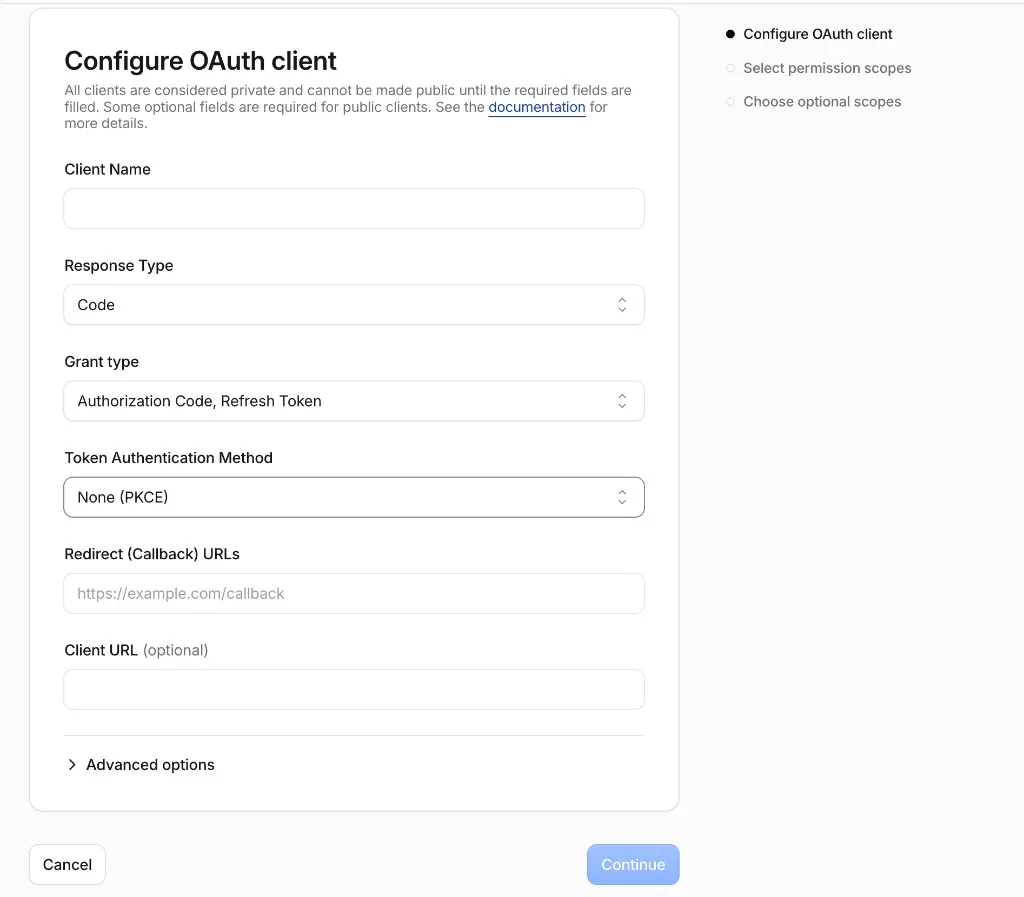
Figure 1: Configure OAuth client.
From top to bottom the page is Client Name, Response Type, Grant type, Token Authentication Method, Redirect (Callback) URLs, Client URL (optional), then a collapsed Advanced options section. After you fill this page, Continue takes you to scopes. The notes below follow that field order.
Client Name
This is the name you see, and the name users see on the consent screen. Use something that separates environments, such as myapp-dev. Do not share one client with production.
Response Type: leave Code only
In Figure 1 this field is already Code. Leave it there. The dropdown can also add Token and ID Token. Those are Implicit: the token lands in the URL #fragment. Browsers never send the fragment to the server. If the callback goes through your backend or an HTTPS relay, that path cannot work. The server only sees the query string.
Cloudflare also does not support Implicit for third-party clients. Do not add Token or ID Token back. They do not give you a shortcut. They only produce errors on the consent screen or at the token endpoint.
Grant type: Authorization Code, plus Refresh Token if you need renewal
In Figure 1 this field is already Authorization Code, Refresh Token. Keep Authorization Code. Keep Refresh Token if you want users to stay signed in without consenting again, and include offline_access when you pick scopes later. If you do not need silent renewal, drop Refresh Token.
Protocol scopes such as openid and offline_access are added or removed from your Response Type and Grant type. You do not assemble them yourself.
Token Authentication Method
This is the client type from the previous section. In Figure 1 the default is None (PKCE).
- Backend or server-side web: change it to
client_secret_basicorclient_secret_post. - SPA, mobile, desktop, CLI: keep None (PKCE).
If you pick one of the secret methods, create shows client_secret immediately. Leave the page and you cannot see it again. Lose it and you have to rotate.
Redirect (Callback) URLs
The placeholder is https://example.com/callback. Replace it with the address that will receive the callback. Official docs accept https://. A custom scheme such as myapp://oauth/callback is rejected. That is the hardest constraint for native apps. Post-logout redirects use the same rule, but they are not on this page.
Desktop and CLI apps can register a loopback address such as http://127.0.0.1:<port>/callback here and skip a relay. That does not mean any http:// URL is fine. An http:// URL aimed at a public IP or a normal hostname should not be in this field.
Every registered value is an allow list. The redirect_uri in the authorization request must match one of them exactly, including scheme, host, port, path, and whether there is a trailing slash. The token request must send that value again, and it must be the same string as the authorization request.
Client URL (optional)
This page marks it optional. A private client can leave it empty. To promote the client to public later, you must fill it, and the domain must pass TXT verification. You can still change the path afterward. You cannot change the domain. Do not put a hostname you will not keep.
Continue opens step two, Select permission scopes, then step three, Choose optional scopes. Scope names are easy to get wrong. Do not invent a colon-delimited form. account:read is rejected. The valid shape is dot-delimited, such as account.read. Those names map to API token permissions. Pick at least one.
All selected scopes are required by default, so the user must accept them together on the consent screen. Only scopes placed in optional scopes can be declined one by one, and they must be a subset of the selected scopes. That is what step three is for.
The official consent screen looks like this: Required on top, which the user cannot turn off, and Additional access below, where Edit Permissions applies to optional scopes.
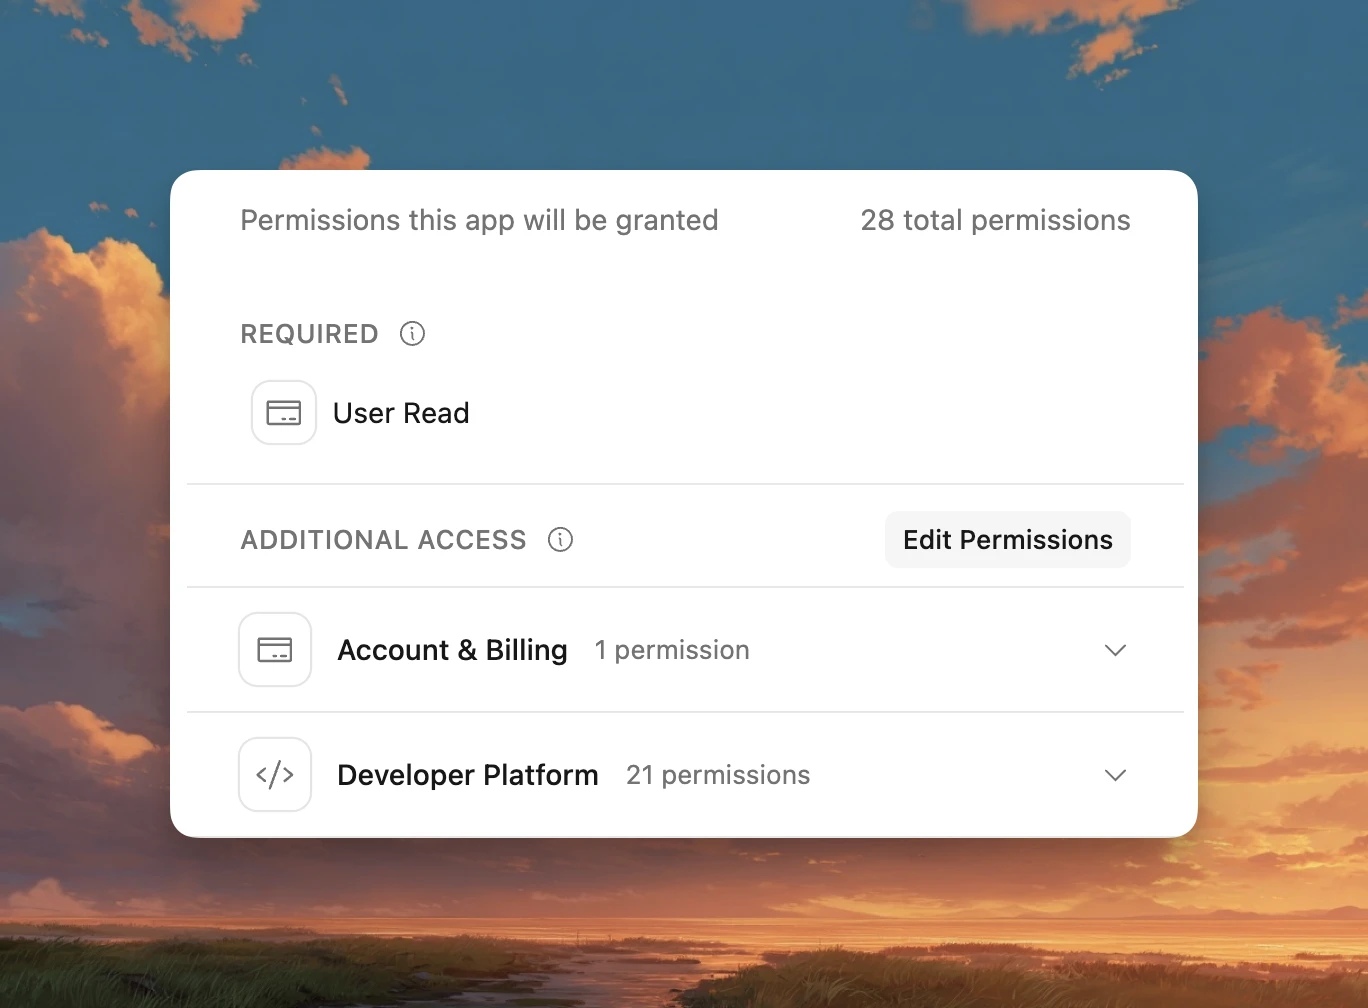
Figure 2: Required permissions are listed first. Optional permissions sit under Additional access.
After Edit Permissions you can filter by Read only / Full access, or search for a scope. That is why you should not mark everything required at create time. Mark a scope optional if the user should be able to turn it off here.
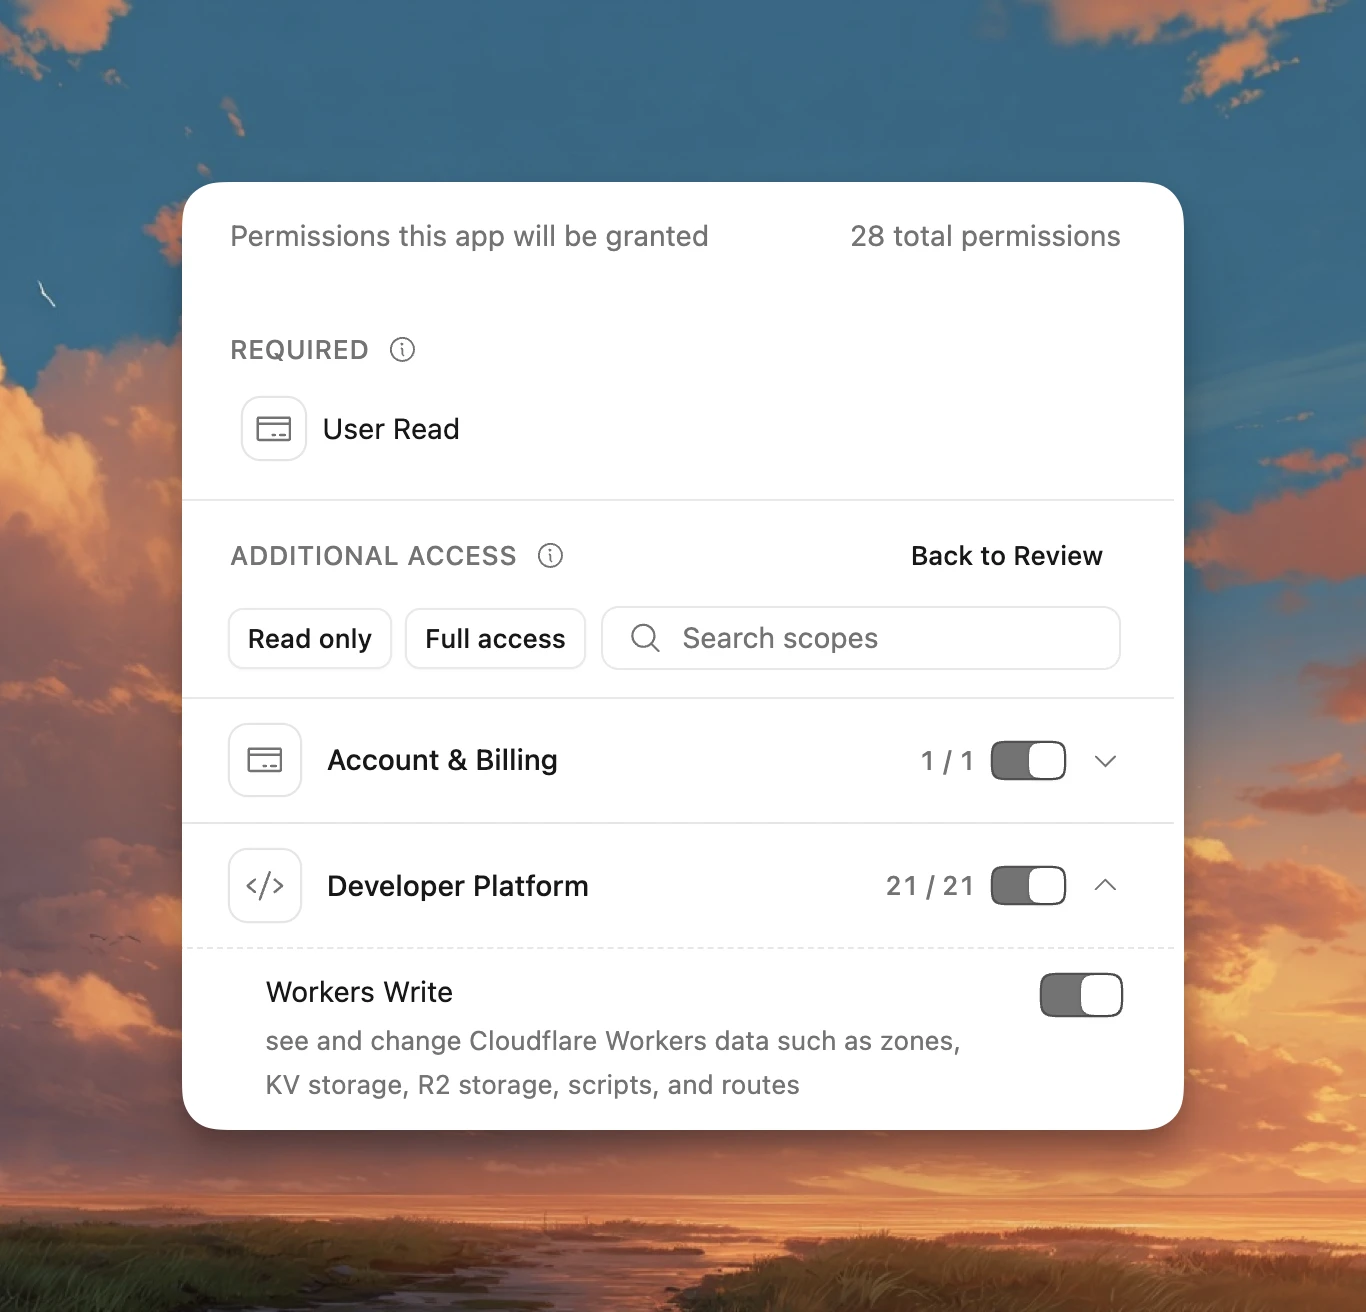
Figure 3: Optional permissions can be turned off one by one. A Required item stays selected.
Do not select scopes the app does not need yet. Anything marked Required cannot be turned off on the consent screen.
Stay private until you decide you need public
New clients default to private: only members of the Cloudflare account that created the client can finish authorization. That is enough for internal tools, local debugging, and your own admin sign-in. It matches the sentence under the title in Figure 1.
To let any Cloudflare user authorize, you have to promote the client to public. Before that you need:
- Client name, Logo, and Client URL filled in
- At least one scope that is not an identity scope
- TXT verification on the Client URL domain. The record value must include the
cloudflare_oauth_client_publisher=prefix. Cloudflare polls for up to two days. If it times out, use Restart.
Promotion to public cannot be reversed. A verified domain cannot be changed to another domain. The path can still change; the domain cannot. Run the full flow as private first, then decide whether to promote.
How the authorization-code flow runs
A complete sign-in is five steps, matching the diagram below. Skip one and later errors usually point at the wrong place.
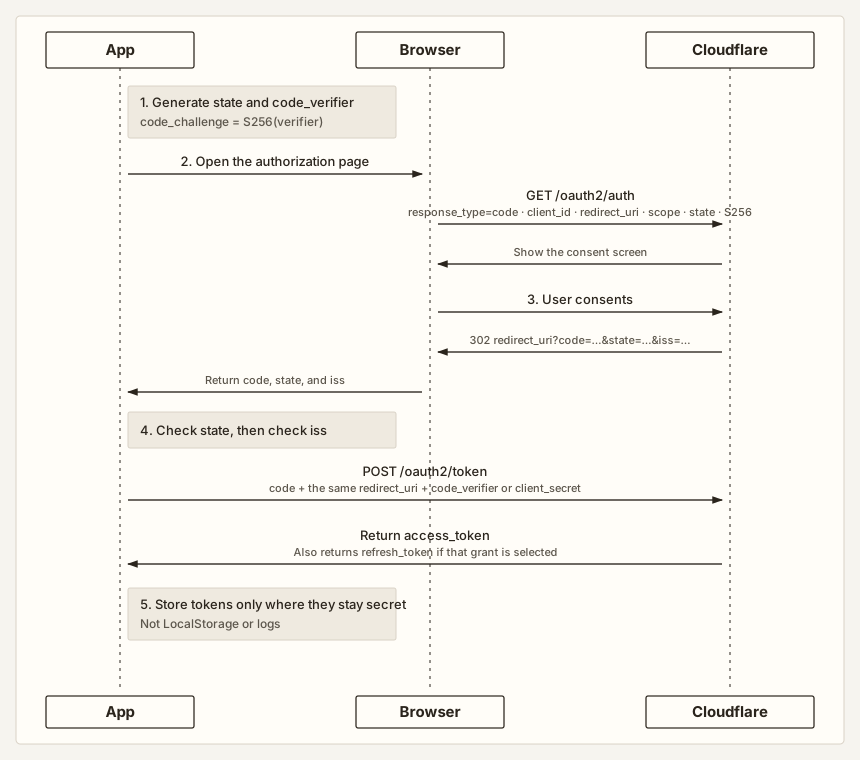
Figure 4: The authorization-code flow among the app, the browser, and Cloudflare. A public client exchanges with code_verifier. A confidential client exchanges with client_secret.
- The app generates
state(for CSRF) and the PKCE pair: a high-entropy randomcode_verifier, thencode_challenge = BASE64URL(SHA256(verifier)). - Open the authorization page in the browser:
GET https://dash.cloudflare.com/oauth2/auth
  ?response_type=code
  &client_id=<client_id>
  &redirect_uri=<the registered value>
  &scope=openid profile email offline_access account.read
  &state=<random value stored by the app>
  &code_challenge=<S256(code_verifier)>
&code_challenge_method=S256- After the user consents, Cloudflare 302s to
redirect_uri?code=…&state=…, often with theissparameter from RFC 9207. - Check
statefirst, theniss. The issuer check is there to stop mix-up: confirm the authorization server that issued the code is the one you expected. Then exchangecodeat/oauth2/token— a public client sendscode_verifier, a confidential client sendsclient_secret. - Keep the access token and refresh token only where this platform can actually keep them secret. Use a secrets store on the server and Keychain on iOS. Do not write them to
UserDefaults, LocalStorage, or logs.
A public client’s token request looks like this:
POST https://dash.cloudflare.com/oauth2/token
Content-Type: application/x-www-form-urlencoded

grant_type=authorization_code
&code=<code from the callback>
&redirect_uri=<must match the authorization request exactly>
&client_id=<client_id>
&code_verifier=<the value generated at the start>
code can be used once and does not last long. Renew later with grant_type=refresh_token. On sign-out, call /oauth2/revoke. Do not only delete the local copy. If you delete it locally, the refresh token on the other side is often still valid.
The HTTPS wall for native apps
Cloudflare does not accept myapp://, and it does not offer Device Authorization. A native app therefore needs a real HTTPS address to receive the callback, then that address has to send code and state back to the app. The auth chain is still Figure 4. The only change is that step 3’s redirect_uri hits the relay first, then 302s into the app.
A common approach is a relay that only issues a 302: register https://<your-domain>/oauth/callback/<appId> in Cloudflare redirect_uris, then jump to myapp://oauth/callback. The relay should not store the code, exchange the token, or hold a secret. state checks and the PKCE exchange still belong on the device.
You are wiring three different URLs. Mixing them is the most common reason native integrations fail:
| Where it goes | What to put | Example |
|---|---|---|
Cloudflare redirect_uris | HTTPS relay URL | https://relay.example.com/oauth/callback/k7m2xq9vn4bt3wp8 |
| Callback URL registered on the relay | Where the app should land | myapp://oauth/callback |
ASWebAuthenticationSession.callbackURLScheme | Only the scheme name | myapp |
On iOS you also have to declare CFBundleURLSchemes under CFBundleURLTypes in Info.plist. Skip that and the system does not know who should handle myapp://, so the relay’s 302 goes nowhere.
With ASWebAuthenticationSession, turn on prefersEphemeralWebBrowserSession so a shared cookie is less likely to sign the wrong account in. On sign-out, call /oauth2/revoke. Do not only clear Keychain.
Common pitfalls
1. redirect_uri does not match, and you get invalid_grant
The redirect_uri in the authorization request must be exactly one of the values registered on the client. The token request must send it again, and it must be the same string as the authorization request. Scheme, host, port, path, and trailing slash all have to match. If a native app authorizes with the HTTPS relay and then exchanges with myapp://…, the token endpoint fails. An authorization code can be used once. Retrying the same code after a failure fails too. Compare the two redirect_uri values first, then check that code_verifier is the one generated when you started authorization.
2. You added Token / ID Token back to Response Type
In Figure 1 the default is already Code. Official docs support Authorization Code only for third-party clients, not Implicit. If you add Token or ID Token, the token goes into the URL #fragment. The browser does not send the fragment to the server, so the backend and the relay never see it. Do not add them back.
3. SPA, mobile, desktop, or CLI still picked a secret method
Official docs put these apps on Authorization Code + PKCE: Token Authentication Method None (PKCE), challenge method S256, not plain. A client_secret is created only if you pick client_secret_basic or client_secret_post. These apps cannot keep that secret.
4. Assuming anyone can authorize a private client
New clients default to private. Official docs say only members of the Cloudflare account that created the client can finish authorization. To let any Cloudflare user authorize, you have to promote the client to public first. After that you cannot change it back to private.
5. The other account turned off Public OAuth App access
If the consent screen cannot select the other account, ask that account’s admin to check Manage Account → Members → Settings → Public OAuth App access. Official docs say this setting restricts OAuth apps from accessing that account’s resources. It is not a field on your client.
6. You do not check state on the callback
state is supposed to appear on the authorization URL and the callback URL. It is there to prevent CSRF. Store a random value when you start authorization, for example in a server session or in app memory. The callback must match. Do not use a fixed value, and do not omit it.
7. The callback includes iss and you skip it
RFC 9207 uses iss to name the authorization server that issued the code. If the callback includes it, compare it with issuer from https://dash.cloudflare.com/.well-known/openid-configuration. Today that value is https://dash.cloudflare.com. Treat the discovery document as the source of truth. Do not hard-code it.
8. You logged code or a token
code and tokens are credentials. Relays and callback handlers should record the result and the error code. Do not record code, state, or tokens, and do not send them to APM or crash reporting.
9. You exchange the token with GET, or you exchange a confidential client in the browser
The token endpoint accepts POST only. A confidential client must exchange on the server. Do not put client_secret in the front end. A public client can exchange on the device, but do not print the token response to the browser console and forget to remove it.
10. You rotated the secret and left the old one in place
Official docs allow two secrets on a client at once: create a new one, point the client at it, then delete the old one. If has_rotated_secret in the API response is true, delete the old secret before you rotate again.
11. Domain verification timed out, so you assumed the config was wrong
Before you promote to public, the Client URL domain needs TXT verification. The record value must include the cloudflare_oauth_client_publisher= prefix as-is. Cloudflare polls that record until it finds it, or until it times out after two days. After a timeout, choose Restart verification in the client menu, or send another PATCH with the same client_uri. That does not mean the domain is wrong.
12. Challenge is enabled on the callback path
If a native app callback goes through your own HTTPS relay, do not enable Managed Challenge, Bot Fight, or other checks that interrupt the redirect. A challenge page inside ASWebAuthenticationSession stops authorization halfway.
Best practices
Select only the scopes the current feature needs. Official docs say those names map to API token permissions, and you must select at least one. Selected scopes are required by default, so the user cannot turn them off on the consent screen. If a scope can be optional, do not make it required.
Use three clients for development, staging, and production, each with its own redirect_uris. Do not register a development callback on the production client.
If you picked client_secret_basic or client_secret_post, official docs show client_secret only at create or rotate time. Leave the page and it is gone. Write it into a secrets manager immediately. Do not put it in chat, an issue, or a screenshot. If you picked None (PKCE), you do not need to configure a client_secret.
Official docs require a new PKCE pair on every login. Generate code_verifier with a cryptographically secure random value, 43 to 128 characters per RFC 7636, and use S256 for the challenge. Tests can use the RFC 7636 Appendix B vectors:
verifier  = dBjftJeZ4CVP-mB92K27uhbUJU1p1r_wW1gFWFOEjXk
challenge = E9Melhoa2OwvFrEMTJguCHaoeK1t8URWbuGJSstw-cM
redirect_uri must match the registered value exactly. If you change the path, outstanding authorization requests will not match. Do not casually change a callback URL that is already registered elsewhere.
Debug as private first. Official docs say only members of the parent account can finish authorization, so failures at that stage should send you back to your code and fields.
On sign-out, call https://dash.cloudflare.com/oauth2/revoke. Do not only delete the local token. Users can also revoke the app under Manage OAuth authorizations in the dashboard.
Record authorization results and error codes in telemetry. Do not write code, state, or tokens into logs.
Read authorization, token, JWKS, and issuer values from https://dash.cloudflare.com/.well-known/openid-configuration. Do not hard-code them.
Troubleshooting
| What you see | Check first |
|---|---|
| Authorization fails immediately, or the consent screen cannot select the other account | Is the client still private? Did the other account turn off Public OAuth App access? Does a scope name use a colon? |
| Callback 404, or a “could not complete” message | Is redirect_uri registered? Is the relay appId correct? Is the app disabled? |
invalid_grant | Are the two redirect_uri values the same string? Does the verifier match? Has the code already been used? |
| You have a token, but the API returns 403 | Does the access token include the scope for that API? Does the user have the matching permission on the target account? |
| Refresh fails | Did create include Refresh Token, and did the request include offline_access? Has the refresh token been revoked? |
| Nothing happens on iOS after the 302 | Did Info.plist declare the scheme? Is callbackURLScheme only the scheme name? |
References
- Create your OAuth client (updated 2026-08-20: supported grants, PKCE, private / public, domain verification, secret rotation)
- Authorizing an application (how Required / Additional access appears on the consent screen)
- Integrate your OAuth client with Cloudflare (endpoint list)
- Choose OAuth scopes for Wrangler and the Cloudflare API MCP server (source of the consent-screen screenshots)
- OAuth Clients API (field rules: visibility can only be promoted, scopes are dot-delimited)
- RFC 6749 (Authorization Code), RFC 7636 (PKCE), RFC 9207 (
iss)
Mttao GitHub ↗
Exploring technology and life's wisdom