cloudflare · · 9 min read
Cloudflare cf CLI: Getting started and migrating from Wrangler
Install Cloudflare cf CLI, preview DNS, D1, and cache requests, and decide when to migrate a Wrangler project. Includes configuration examples, agent permissions, and a build-once CI workflow.
 Mttao @bearboy80 1,955 words 中文 →
Deploy a Worker with Wrangler, open the dashboard to change DNS, then look up an API endpoint to write a cache purge script. If you use Cloudflare, that routine probably sounds familiar. The new cf CLI brings those operations into one command-line tool, alongside local development and deployment for Workers.
I’d start with resource queries and request previews. For a new Worker, try it in a separate project. For a Wrangler project that’s already running reliably, inspect the migration before changing deployment commands. cf is still in public beta, and its configuration format and Build Output can change. There’s no need to move every project at once.

Figure 1: Cloudflare’s cf CLI launch illustration, from the official announcement.
Where to start using cf
cf generates API commands from schemas and returns JSON by default. Workers projects use cloudflare.config.ts for configuration. You can use the CLI for either resource management or project development, but the starting point depends on what you’re working on:
| What you’re doing | Where to start | What to check |
|---|---|---|
| Creating a Worker project | cf init → cf dev → cf build | Local routes, bindings, and build modes |
| Managing DNS, cache, R2, D1, or other resources | Queries, cf schema, and --dry-run | Account, zone, permissions, and request scope |
| Maintaining a Wrangler project | cf migrate --dry-run | Bundler choice, follow-up items, and the existing build process |
| Giving a coding agent access to Cloudflare | Search → inspect the schema → preview | Token scope and permission to execute the change |
Your Worker can keep deploying through Wrangler while you use cf to manage DNS or query resources. Deal with project migration when you’re ready to switch to cf dev or cf deploy.
Install, sign in, and pin a version
Check your Node.js version first: cf requires 22.18 or later. Bun isn’t supported as a runtime; commands that load cloudflare.config.ts fail on it. The package installs both cf and cloudflare, which run the same CLI. If another tool already uses the name cf, use cloudflare.
npm install --global cf
cf --version

# Command discovery doesn't require a login
cf cli search "create a DNS record"
cf schema dns records create
Searching for commands and reading schemas don’t need credentials. Sign in when you want to read remote resources or make a change:
cf auth login
cf auth whoami
cf zones list
You need to sign in to cf even if you’re already signed in to Wrangler. Credential lookup starts with CLOUDFLARE_API_TOKEN, followed by the profile selected with --profile, the profile bound to the current directory or its nearest parent, and finally the default login profile. Global API Keys aren’t supported.
A global install is convenient for trying the tool. Once you use it in a project, pin the version. Otherwise, your local commands might work while CI downloads a different beta release. After migrating an existing project, add the version you’ve checked to its development dependencies and commit the lockfile:
# Replace the placeholder with a version you've verified
npm install --save-dev --save-exact 'cf@<VERSION>'
npx cf --version
Projects created with cf init already include the cf dependency. See the getting started documentation for installation and authentication details.
Search when you don’t know the command
More product coverage means more commands to remember. With cf cli search, you can describe the task and get candidate commands: create a DNS record, create a D1 database, or purge a URL from cache.
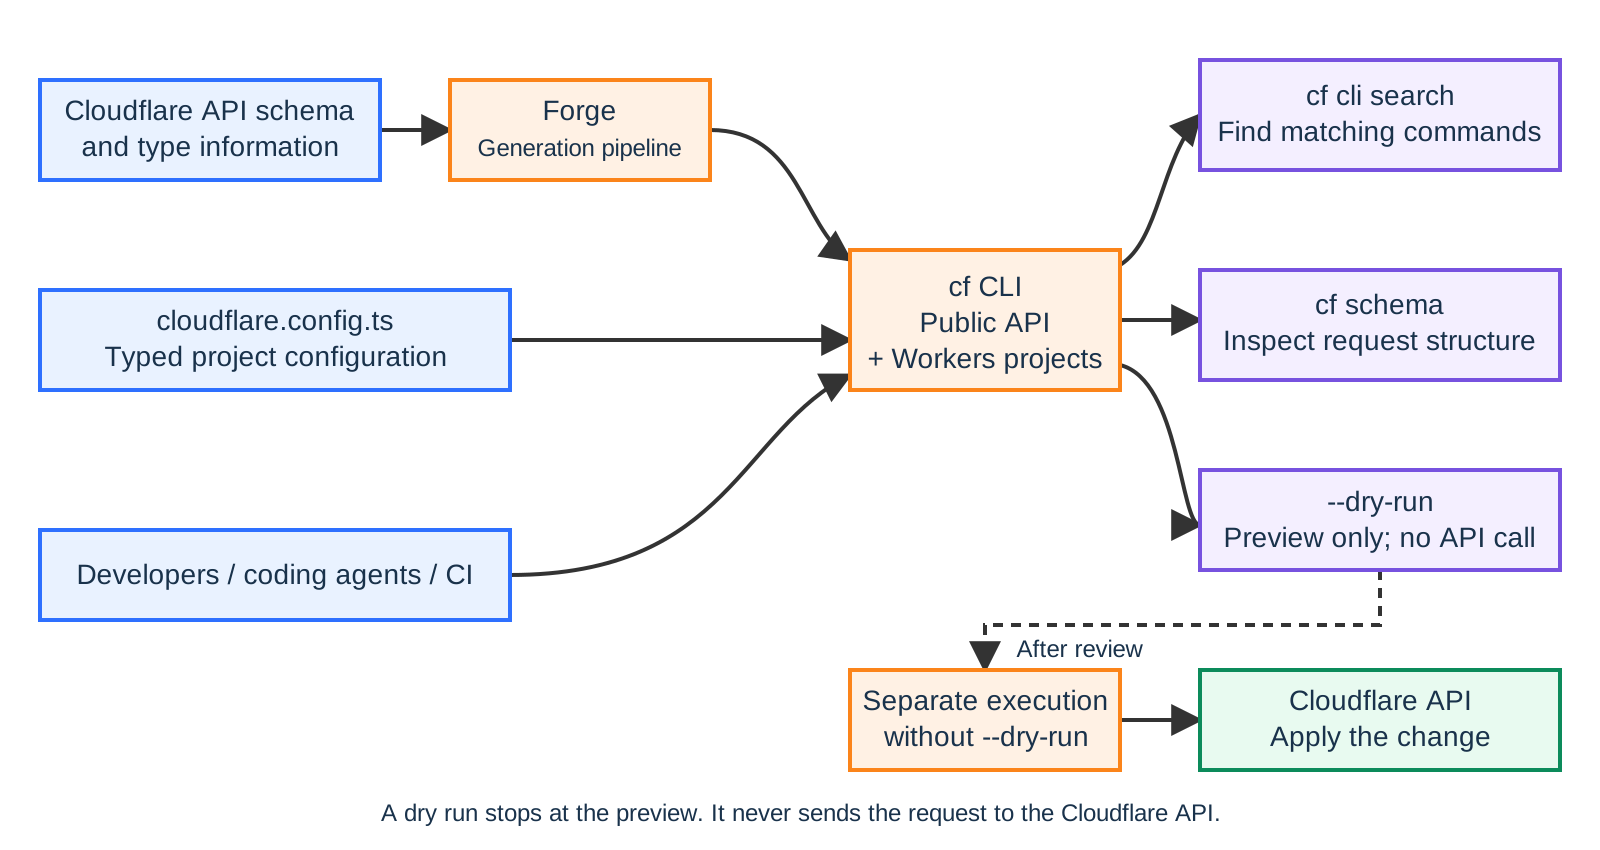
Figure 2: Command generation and execution in cf. A dry run stops at the request preview. Making the change requires a separate invocation without --dry-run.
cf cli search "create a DNS record"
cf cli search "create D1 database"
cf cli search "purge cached files for a URL"
Once you find a candidate, inspect its arguments:
cf schema dns records create
cf dns records create --help
cf schema shows the API request structure for a generated command. --help shows how to invoke it. If you’re writing a script, pay attention to output streams too: results normally go to standard output as JSON, while status messages and errors go to standard error. Commands that download files return raw data, so don’t send every result through a JSON parser.
Preview resource changes with a dry run
Take DNS. Knowing that you want to add a record isn’t enough. You also need the right zone, destination IP, and proxy setting.
Add --dry-run to a generated API command to see its HTTP method, URL, parameters, and body. It sends no API request and needs no credentials. You can inspect the request before running it, but a preview can’t confirm that the remote resource exists or that your token has permission to access it.
DNS: Add an A record
cf cli search "create a DNS record"
cf schema dns records create

# Replace the placeholder with a zone ID; this won't create a record
cf dns records create \
  --zone '<ZONE_ID>' \
  --body '{"type":"A","name":"docs","content":"192.0.2.1","proxied":true}' \
  --dry-run
192.0.2.1 is a documentation address. Replace it with your origin’s IP before executing the command. Check the zone and record name in the preview as well. proxied: true enables Cloudflare’s proxy; choose that setting with your origin access and TLS configuration in mind.
There’s an easy-to-miss difference here: use a zone ID for the dry run. Normal execution accepts a domain name with --zone, but a dry run doesn’t look up its ID. Pass a domain name and the preview puts it directly into the ID position in the URL.
After reviewing the request and configuring credentials with the required permissions, remove --dry-run to execute it. Then query the record:
cf dns records list --zone example.com --name docs.example.comThe resource management documentation explains these options.
D1: Create the database, then configure the binding
Suppose you need an orders-staging database for staging. Preview the request first:
cf cli search "create D1 database"
cf schema d1 create
cf d1 create --name orders-staging --dry-run
Confirm the database name and target account, set CLOUDFLARE_API_TOKEN and CLOUDFLARE_ACCOUNT_ID, then create it:
cf d1 create --name orders-stagingNext comes the Worker binding in cloudflare.config.ts. Creating the database successfully doesn’t guarantee that the Worker points to it. When troubleshooting, check the database first, then the binding. The configuration example below selects a database name by environment.
Cache: Purge the file you changed
If you’ve updated one JavaScript file, purge that URL. A full purge would also make other cached files fetch from the origin again:
cf cli search "purge cached files for a URL"
cf schema cache purge

cf cache purge \
  --zone '<ZONE_ID>' \
  --body '{"files":["https://example.com/assets/app.js"]}' \
  --dry-run
The preview shows POST /zones/<ZONE_ID>/purge_cache, with just that file URL in the body. Check the complete URL and file list for the wrong environment or a missing path.
These are examples; they haven’t been executed against a live account. After upgrading the beta, check cf schema and --help again for parameter changes.
Configure Workers with TypeScript
Start a new project in its own directory:
cf init edge-api
cd edge-api
cf dev
Get the routes and bindings working locally before building and deploying. New projects use Vite by default, with configuration in cloudflare.config.ts.
That file can return different settings based on mode. Builders such as bindings and triggers provide type hints, so you don’t have to remember every field. For example, you can select a D1 binding by environment:
import { bindings, defineConfig } from "cf/config";

export default defineConfig(({ mode }) => ({
  worker: {
    name: "orders-api",
    compatibilityDate: "2026-09-27",
    env: {
      DB: bindings.d1({ name: `orders-${mode}` }),
    },
  },
}));
With --mode staging, this selects orders-staging; with --mode production, it selects orders-production. The snippet only shows the binding. You still need to create the database, as in the earlier example. A full project also needs an entry point and build configuration; see the programmatic configuration documentation.
Turning repeated environment settings into a function is convenient. But TypeScript configuration executes code and can read environment variables or import modules. Follow those dependencies during review and check which Worker and database each mode selects.
For local debugging, Local Explorer lets you inspect supported KV, R2, D1, and other resources. Only some commands support --local. Unsupported commands return an error rather than switching to remote resources; check the documentation for the command you’re using.
Inspect migration before switching a Wrangler project
If a repository has wrangler.json, wrangler.jsonc, or wrangler.toml but no cloudflare.config.ts, hold off on cf dev, cf build, and cf deploy. Those commands can trigger automatic configuration that ignores the existing Wrangler settings, or they can fail. Start with cf migrate.
Create a feature branch, commit or stash your current changes, then preview the migration:
git status
cf migrate --dry-run
The preview lists the files it would change and the follow-up work. It doesn’t show the full contents of generated files. To inspect the actual configuration, run the migration and review the diff:
cf migrate
git status
git diff
The original Wrangler configuration stays in place. The tool creates cloudflare.config.ts alongside it, adds cf to the project’s dependencies, and updates the lockfile.
Check the bundler choice separately. If the project declares @cloudflare/vite-plugin, the migration selects Vite. Otherwise, it selects Wrangler and creates wrangler.config.ts. cf migrate doesn’t install Vite or generate vite.config.ts, so switching bundlers requires extra work.
Settings that need manual review are marked with TODO(@cloudflare). When required items remain, the generated configuration includes a throw that stops the build. Resolve those items before removing it. Durable Object bindings and migration history need particular care; deleting the comments doesn’t resolve the underlying work.
Migration and preview commands can return exit status 1 when required items remain. Read the follow-up list before treating the exit code as a conversion failure. The migration guide covers bundler requirements and follow-up items.
Once the configuration is ready, run the project locally and check staging:
cf dev
# Check local behavior, stop the development server, then continue
cf build --mode staging
cf deploy --dry-run --mode staging
Check every environment the project uses. A successful staging build says nothing about whether production resource names and routes are correct. Run the existing build steps too, before changing the production deployment workflow.
Agents: Check credentials and exit codes
An agent can search for commands, read schemas, and present a request preview for review. Put the execution sequence in the project’s instructions:
- Find candidate commands with
cf cli search. - Read
cf schemaand the command’s--help. - Generate a preview with
--dry-run. - Check the account, zone, request body, and permitted scope.
- Execute with restricted credentials, then query the resulting state.
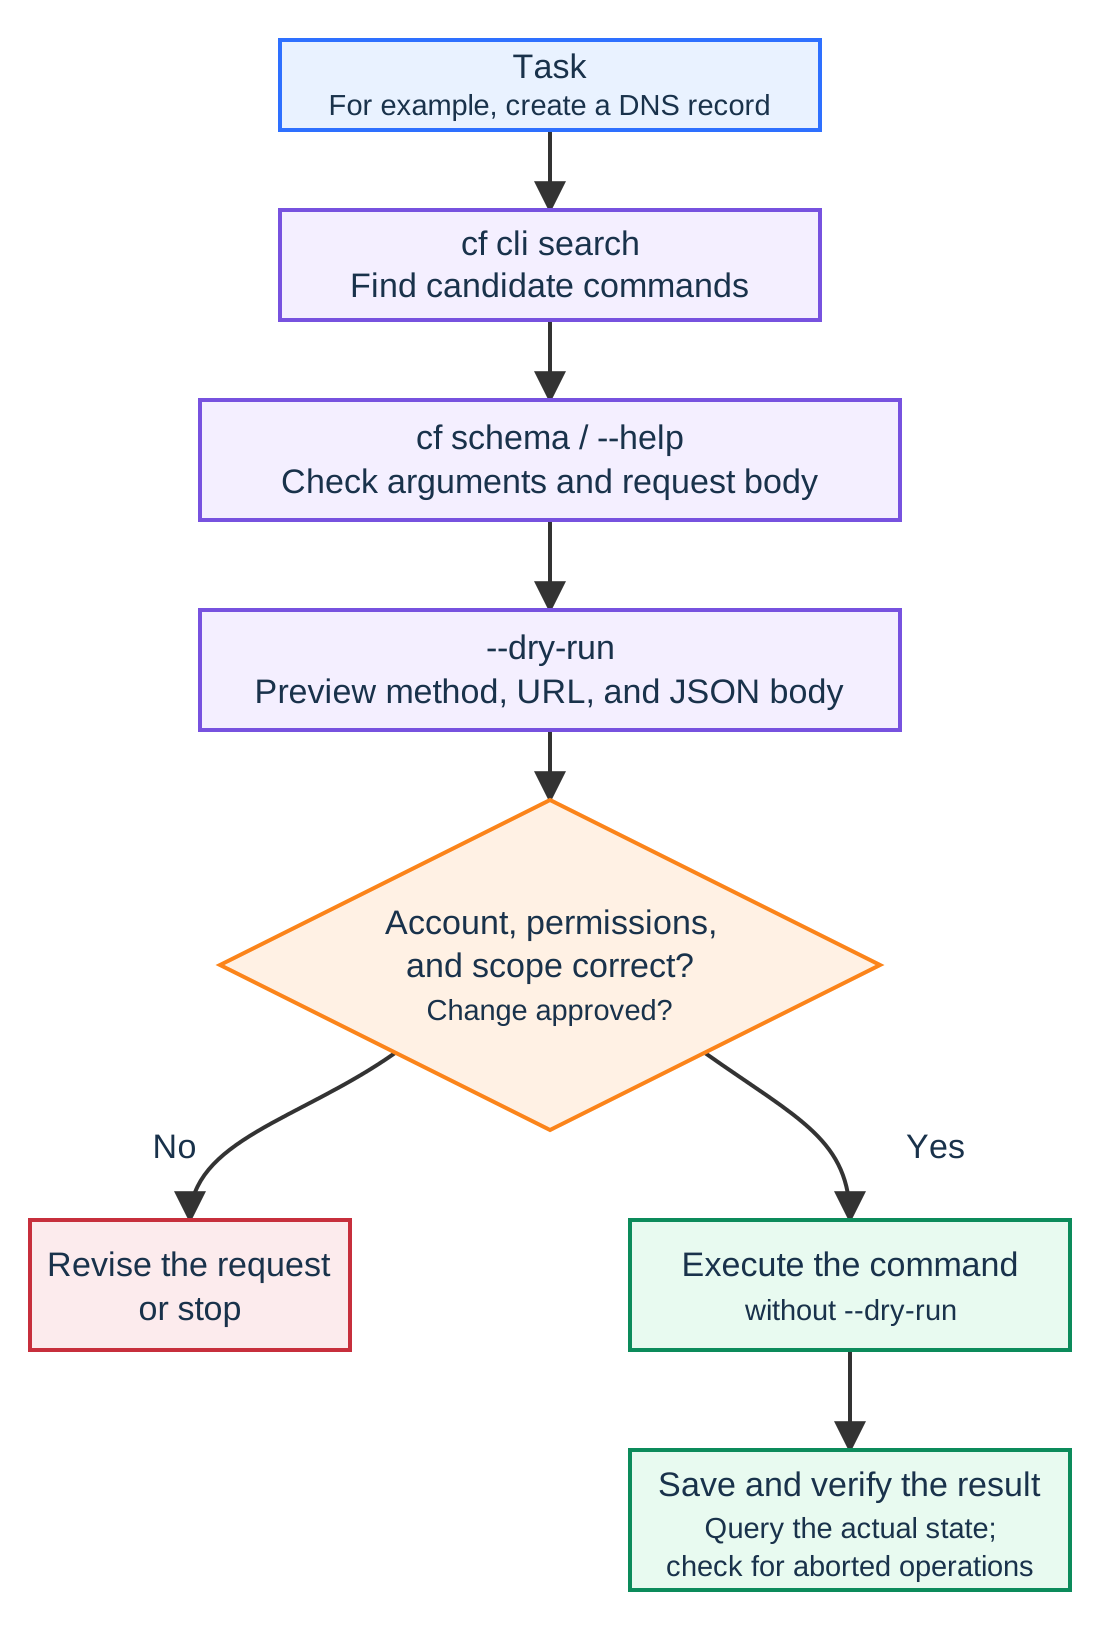
Figure 3: Checks for a Cloudflare change. After inspecting the preview, decide whether to allow execution. Query the actual state afterward.
Use separate profiles for personal and work accounts. Unattended agents and CI jobs should use API tokens with only the permissions they need. Even if the project instructions require a review, the credentials should restrict which resources the agent can change.
One behavior is easy to miss in scripts: a destructive command without --force in a non-interactive session can print Aborted., make no change, and still exit with status 0. The pipeline looks successful, but the resource is still there. Check standard error and query the resource afterward.
Don’t add --force to every command just to keep a script running. For some commands it’s also an API parameter and can change the scope of the operation. Read that command’s help first; the coding agents documentation explains the behavior.
Build once in CI
Build and preview in the pull request stage without a production token. At deployment time, use --prebuilt to upload the output you’ve already checked:
# PRs and other branches: build and preview without uploading or calling the Cloudflare API
npx cf build --mode production
npx cf deploy --prebuilt --mode production --dry-run

# Protected deployment step: provide credentials and deploy the same output
npx cf deploy --prebuilt --mode production
--prebuilt skips the build and uses existing Build Output. Both steps here use --mode production; a mode mismatch stops deployment before anything is uploaded. If build and deployment run in separate CI jobs, pass .cloudflare/output between them so the deployment job has the checked output.
Provide CLOUDFLARE_API_TOKEN and CLOUDFLARE_ACCOUNT_ID only to the final deployment step. Building and previewing don’t call the Cloudflare API, though dependency installation and custom build scripts can still access the network. The CI documentation has a complete example.
For an existing project, I’d make the migration criteria concrete: resolve every migration TODO, pass builds and previews for each environment, and verify an actual deployment in a test environment before changing production CI. If the Wrangler setup is working reliably, keep that deployment process while you try cf for resource queries and API request previews.
References
- Introducing cf: the agentic CLI for the entire Cloudflare API
- Cloudflare CLI documentation
- Installation, authentication, and account selection
- Command discovery, resource operations, and dry runs
- Programmatic configuration with cloudflare.config.ts
- Migrate a Wrangler project
- Commands and execution rules for coding agents
- CI and automated deployment
Mttao GitHub ↗
Exploring technology and life's wisdom