Shopify · · 12 min read
Shopify Theme Development: Buy, Customize, or Build Your Own?
Decide whether to keep a commercial Shopify theme, customize it, build your own, or go headless. A practical guide to theme structure, the editor, app integration, version control, and performance.
 Mttao @bearboy80 2,464 words 中文 →
“Should we buy a theme or build our own?” often comes up at the start of a Shopify project. I would first ask: Can the existing theme support the work we are about to do?
If the storefront runs on Shopify’s Online Store channel, it uses a theme. Themes consist of Liquid, HTML, CSS, JavaScript, and related files. You can buy one or develop your own; choosing not to use a commercial template still means building a Shopify theme. Going headless means building the storefront separately and connecting it to Shopify’s commerce capabilities through APIs.[1] [2]
I tend to be cautious here. If the header, navigation, main product section, cart, global styles, and most frontend scripts need rewriting, I would stop treating the project as a few theme tweaks. The team is effectively maintaining its own theme, while still carrying the commercial theme’s code.
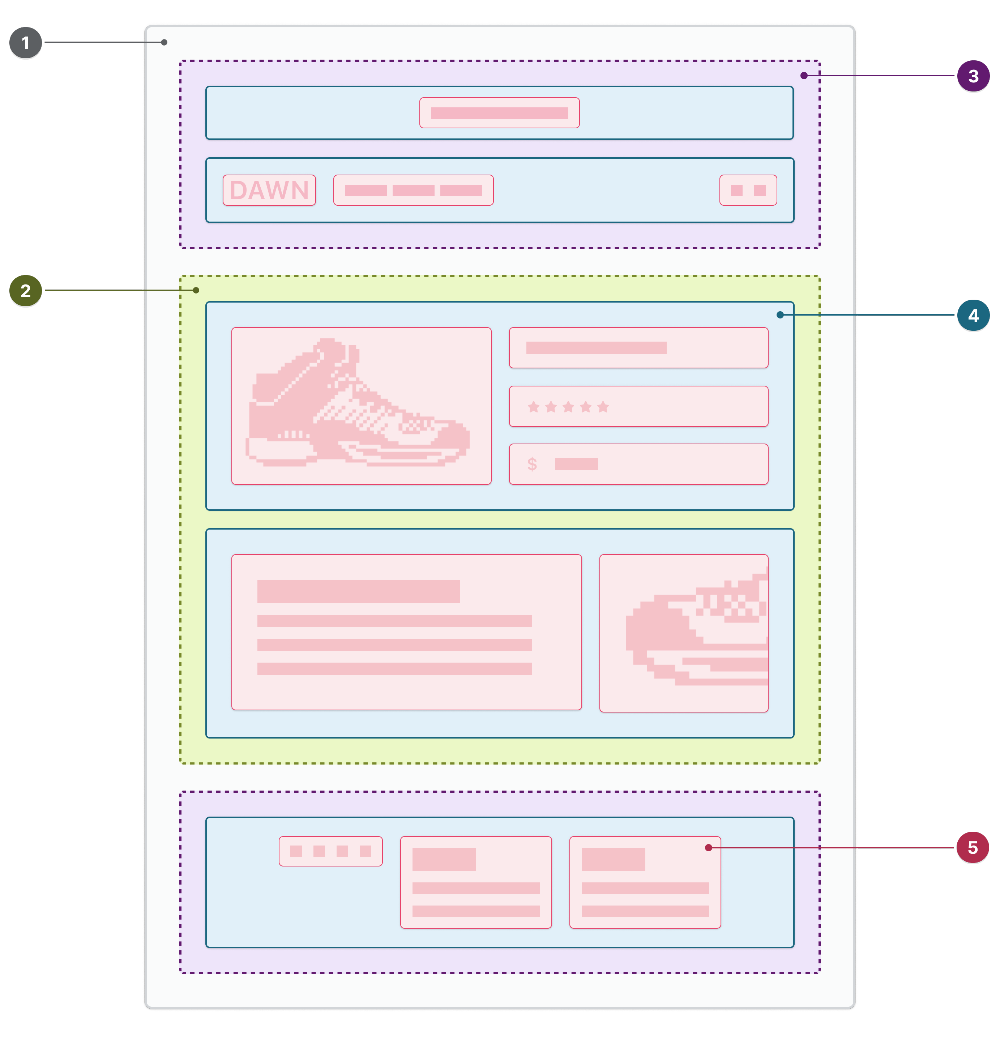
Figure 1. In Shopify’s theme architecture, the layout provides the outer framework. Templates and section groups arrange different page regions; sections, blocks, and snippets handle modules, editable content, and code reuse.[2]
Separate theme development, headless, and platform decisions
The flowchart below starts with two questions: will the store keep using Shopify Online Store and Shopify Checkout? If so, how much of the existing theme’s core structure can stay?
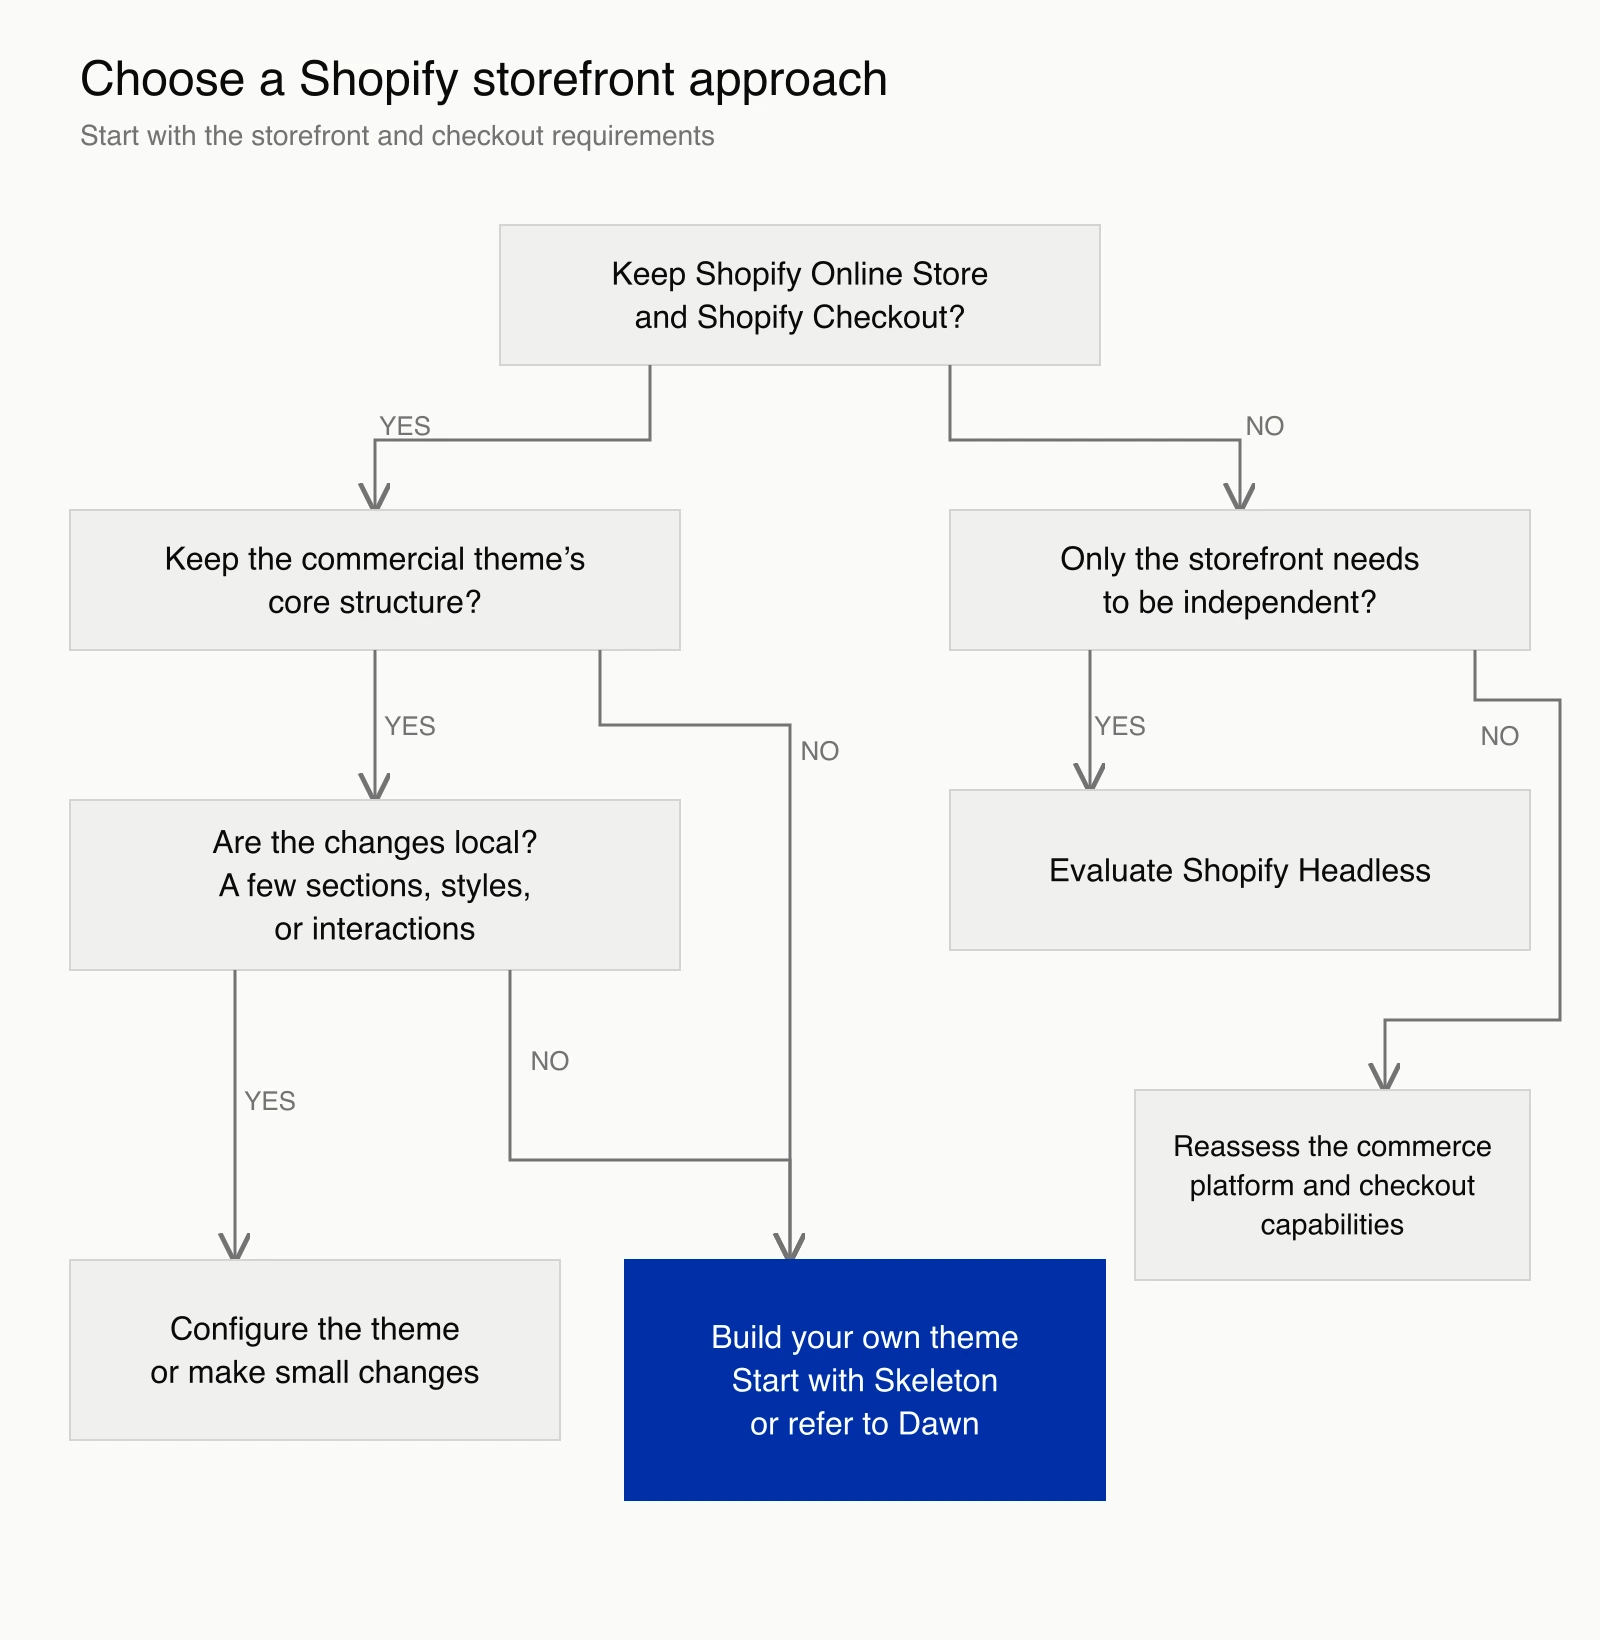
Figure 2. Customizing a theme, going headless, and changing commerce platforms are decisions at different levels.
If the store will continue using Online Store and Shopify Checkout, I would consider theme development first. Liquid, a little JavaScript, and the Ajax API can already handle many product page, cart, and partial page updates. There is no need to introduce React just to make the stack look modern.[1]
If you need to customize the information, shipping, or payment steps in checkout, first check whether Shopify Plus’s Checkout Extensibility covers the requirement. Checkout UI extensions on those steps are currently limited to Plus. They add interfaces and workflows at defined extension points; they do not let you freely replace the entire checkout. A headless storefront does not bypass those plan or platform restrictions.[12]
If Shopify’s checkout, payments, orders, or data capabilities cannot support a critical business rule, reassess the commerce platform. Building a headless product page first will not solve that restriction.
Compare the four development options
| Approach | When it fits | What you maintain |
|---|---|---|
| Configure an existing theme | A new brand with standard product data and pages close to the theme’s defaults | Content configuration, app compatibility, and theme updates |
| Customize a commercial theme | The core structure still works; only a few modules, styles, or interactions need changing | Custom code and merges with upstream theme updates |
| Build your own theme | Navigation, product pages, the cart, and the design system need coordinated, ongoing development | Theme code, the editor experience, performance, and app integration |
| Build a headless storefront | The frontend must share an architecture with an existing main site, CMS, app, or PWA | A separate frontend, API integration, and the corresponding content and operations tools |
The choice depends on which core parts you plan to change.
When buying a theme is enough
For a new brand with standard product data and pages close to an existing theme, I would start with a Theme Store purchase and configure it. That leaves more time for product selection, content, and testing conversion. Building a component library at this stage may not be a good use of time.
The store’s content team can change colors, fonts, images, copy, and the sections the theme already provides. Page structure and interaction still depend on the theme. Once the requirements include a new header, new product cards, a rearranged product page, different cart behavior, and five campaign page templates, editor settings alone will not be enough.
When a commercial theme is worth customizing
If the underlying structure still works, limited customization is usually straightforward: add a marketing section, adjust product highlights, introduce a small interaction, or restyle a card to suit the brand.
I would first check how much of the theme’s core the work touches:
- Do
layout, the header, and the footer need rebuilding? - Do the main product section and product cards need rebuilding?
- Does the cart’s layout or interaction need rebuilding?
- Will the global design tokens, CSS architecture, and main JavaScript all be replaced?
- Will the team keep adding features over the next six months?
If most answers are yes, I would lean toward replacing the foundation. Continued customization can get the store live, but theme upgrades, style conflicts, and new app integrations become harder to manage. Maintenance may consume the time saved at the start.
Plan for upgrades before making those changes. When a Theme Store theme has a new version, you can add the updated copy to your draft themes. Editor settings, section order, content, and app configuration carry over. Code changes are retained only when they do not conflict; the team must migrate conflicting changes itself. Themes purchased elsewhere or uploaded to the store do not have the same update support.[6]
Decide whether the team will keep merging upstream updates or maintain an independent fork. Either can work, but someone needs to own that choice.
When to build your own theme
If the design system, product information structure, and content workflow need ongoing development, I usually prefer a custom theme. Shopify already supplies the standard theme structure, Liquid, the Ajax API, CLI, and Theme Check. You do not have to build an ecommerce system from scratch. A new theme can start from Skeleton, with Dawn as a reference for Online Store 2.0 implementation.[1] [2]
I would recommend this approach when:
- Product pages, collection pages, the cart, and navigation all need rebuilding.
- Different product categories need different information structures, rather than more switches in one product template.
- The content team changes pages every week, but the existing theme editor does not fit how they work.
- Old scripts, CSS, and leftover app code are slowing down debugging.
- The team intends to maintain the storefront over time, rather than run a short campaign.
With a custom theme, the team owns both the code and its maintenance. I would rather work with one consistent design and set of behavior than heavily rewrite a commercial theme and keep resolving conflicts with its original implementation.
Organize components and data in a custom theme
I try to avoid an all-purpose section that handles a carousel, reviews, subscriptions, and article listings. It becomes hard to change in code and hard for the content team to use in the editor.
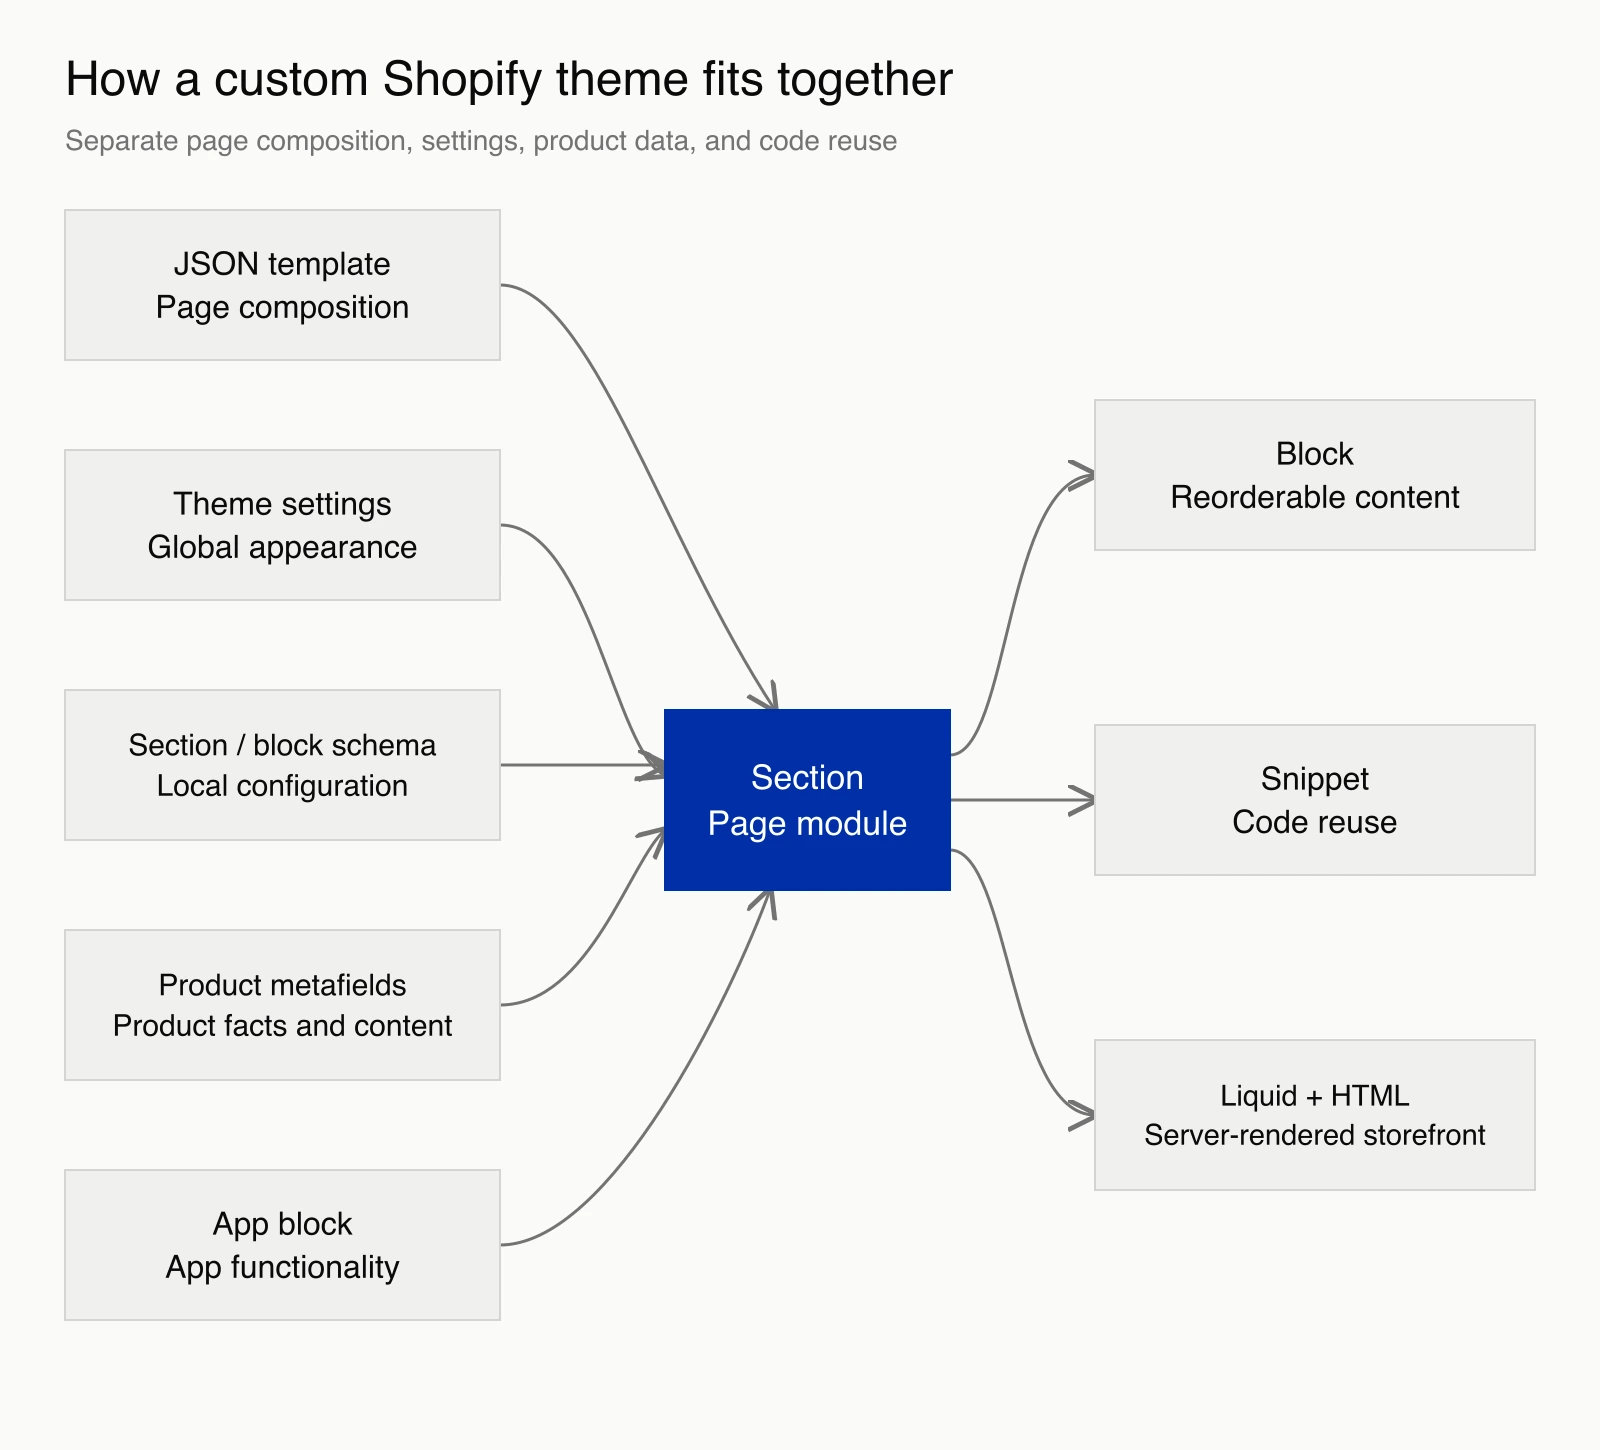
Figure 3. Keep page composition, content modules, code reuse, display settings, and business data separate.
Templates: page composition
A JSON template defines the sections a page contains by default and their order. Products, collections, articles, and ordinary pages can use different templates. A resource type can also have several templates, so every variation does not need to become another conditional in a large main-product.liquid file.[2]
Sections: page modules
Heroes, split image-and-text layouts, product highlights, FAQs, and recommendations work well as sections. Merchants can add, remove, and reorder them in JSON templates.[2] [3] Each section should handle one kind of content. A product highlights section might offer two or three layouts, while carousels, reviews, subscriptions, and article lists remain separate modules.
Blocks: editable content within a module
FAQ entries, product information items, content cards, and button groups work well as blocks. Shopify advises against making blocks too granular, and recommends layouts that work with different block sequences.[3] If a heading, text, icon, and link always appear together, keep them in one block so rearranging them does not break the layout.
Snippets: code reuse
Product cards, prices, images, icons, and form fields can live in snippets. Snippets do not appear in the Theme Editor, so do not hide content or settings there if the store’s team needs to configure them.[2] [4]
Settings and metafields: presentation and business data
Global fonts, colors, and general layout preferences belong in settings_schema.json. Local section and block options go in their respective schemas. Product-specific material, size charts, care instructions, and country of origin usually fit better in product metafields, connected to sections through dynamic sources.[4] This is a design choice, not a Shopify requirement, but it avoids copying the same product facts into several page configurations.
The Theme Editor is what the content team uses
The store’s team uses the Theme Editor to change content and build pages. When developing a theme, I give that experience as much attention as the customer-facing storefront.
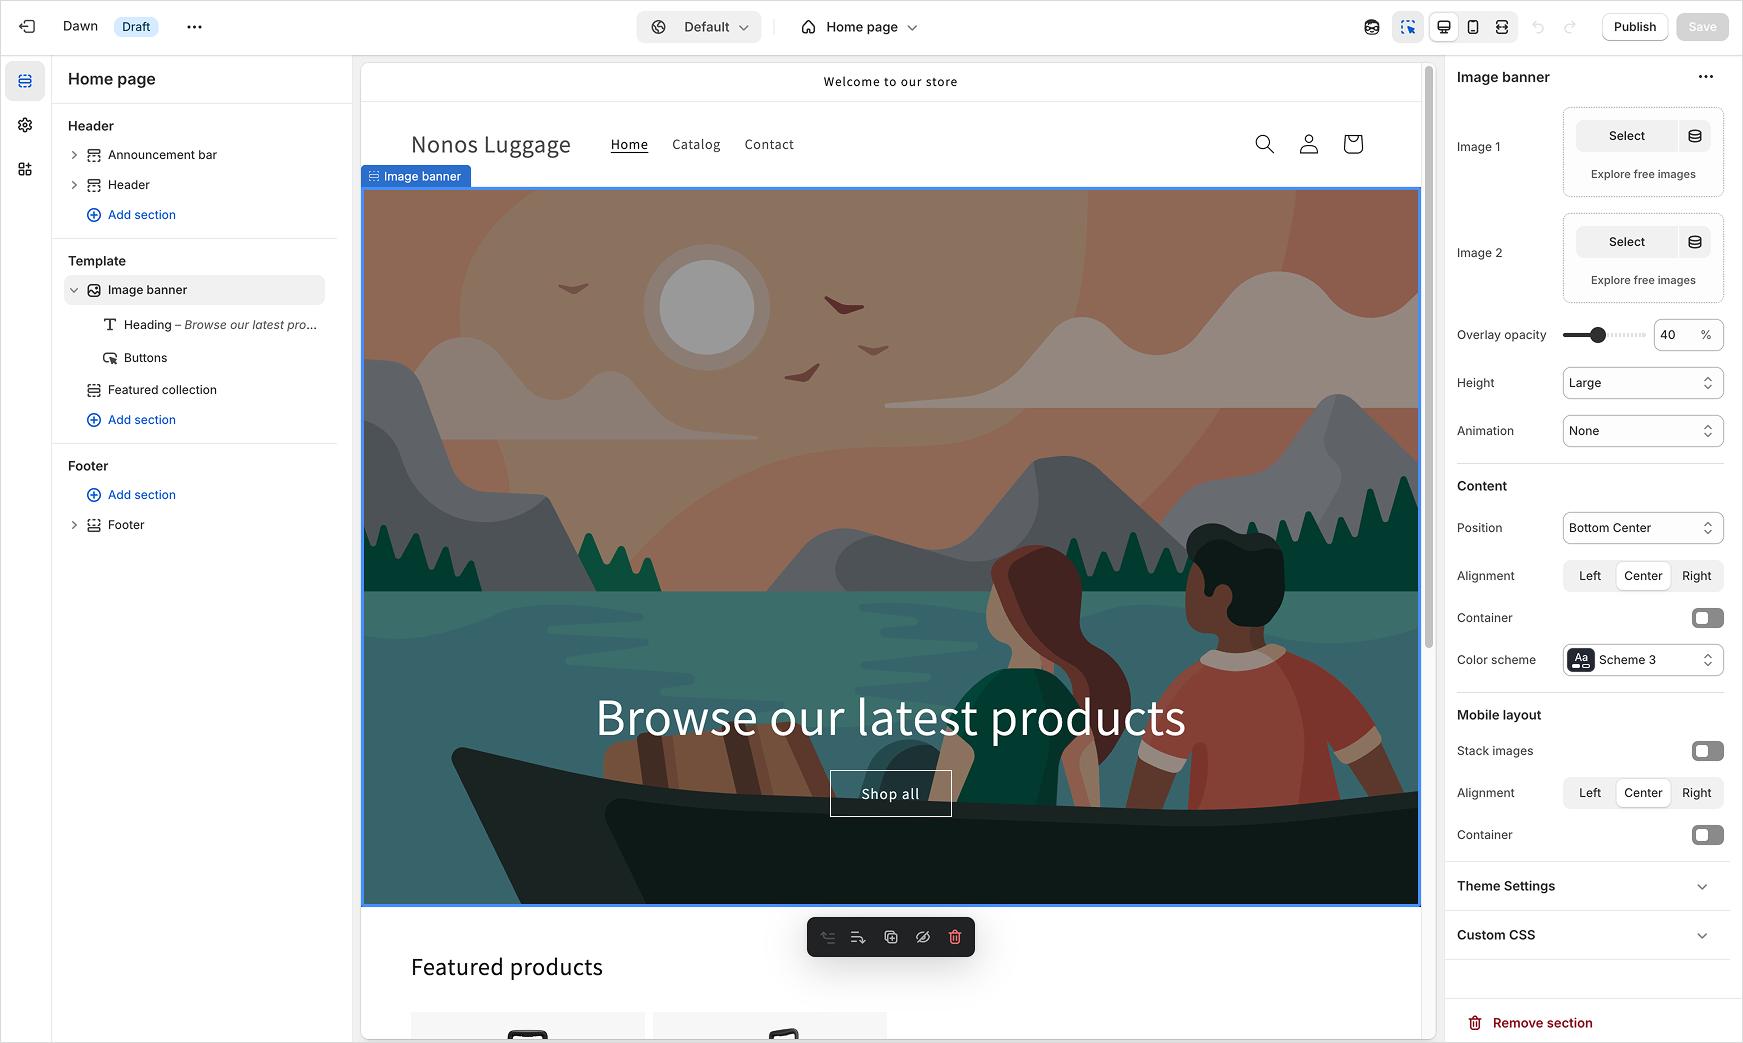
Figure 4. Developers define the schema; the store’s team edits content, order, and the settings exposed by that schema. The preview should closely match the published storefront.[13]
More settings can make the editor harder to use. Before adding switches for colors, spacing, and layouts, I would ask how the team works. What changes when a new product launches? Which modules do they drag into a campaign page? What needs editing when they replace the main visual at short notice? Expose settings around those tasks.
Settings can be defined globally, in sections, or in blocks. Some can connect to dynamic sources. Alongside normal page loads, test adding, removing, moving, and reloading sections inside the editor. Shopify expects the preview to stay close to the live storefront, and the editor fires events when sections or blocks are edited.[4] [13]
Prefer app blocks and app embeds for integration
For reviews, subscriptions, search, and membership features with their own backend and business logic, prefer apps that support Online Store 2.0 app blocks or app embeds. Theme app extensions expose an app’s Liquid blocks, assets, and configuration in the Theme Editor without modifying theme files during installation.[5]
If an existing app cannot cover the requirement, start with Choosing a Shopify App Stack: Official Template, Hybrid, or Custom before building your own. It helps you decide where the merchant works and which Shopify integration code your team will maintain. For local setup, see the Shopify App Development Environment Setup Tutorial. Its terminal examples use an older Shopify CLI and the Remix scaffold.
Apps that modify theme files directly often leave code that is difficult to trace after an upgrade or uninstall. App blocks use Shopify’s extension mechanism, which makes their source and integration clearer. Their styling and performance still need testing on real product pages, in the cart, and on mobile.
For an app that calls the Admin API, handles webhooks, or syncs data in the background, Choosing Between Shopify Online and Offline Access Tokens explains how staff permissions and store-level work affect credential choice, storage, and refresh.
Plan version control, previews, and performance together
Theme code needs version control, previews, and a release process. Start with Shopify CLI for a development theme and local checks. Theme Check can inspect Liquid and JSON in the CLI, CI, or an editor for syntax errors, missing templates, unused variables, deprecated tags, and some performance issues.[1] [9]
With Shopify GitHub integration, saved changes from the theme editor, code editor, and theme apps are automatically committed to the connected branch. That helps track changes, but does not replace code review.[8] Restrict direct editing of the production theme, and carry emergency fixes made in Admin back into the source code the team maintains.
Use a separate branch and draft theme for campaigns and major sales. Shopify’s version control guide recommends non-main branches for campaigns, then republishing the theme connected to the main branch when the event ends.[7]
Check performance during development. Do not lazy-load the LCP image in the initial viewport; give it a higher download priority. Render essential product information, initial copy, and navigation directly in Liquid and HTML instead of waiting for JavaScript. Nested Liquid loops can slow server rendering as product and variant counts grow. Excessive preload directives and third-party scripts also compete for initial loading resources.[10]
Shopify requires themes submitted to the Theme Store to achieve an average Lighthouse performance score of at least 60 across the home, product, and collection pages.[10] That is an acceptance threshold. I would not use it as the performance target for a store’s own theme. Test with the actual product count, images, apps, and mobile network conditions.
How I would choose for three common projects
For a new DTC brand with simple product data and a design close to an existing theme, I would buy a theme and configure it or make limited changes. Once the store starts selling, decide which parts justify further development.
For a brand committed to operating over the long term, with product pages, navigation, the cart, and content modules all being rebuilt—and a team frequently creating campaign pages—I would choose a custom theme. Continuing to modify a commercial theme leaves those structural conflicts to be handled later.
For a company with an existing main site, CMS, native app, or PWA, where the frontend must share that system and Shopify handles commerce, I would evaluate headless. Shopify similarly recommends considering the complexity of a custom storefront when existing sales channels, themes, and apps cannot meet the required architecture, workflow, or experience.[11]
Choose around the maintenance work ahead
For most Shopify stores, themes are the quickest way to connect commerce, content editing, apps, and checkout. I would choose the foundation around the development work ahead: keep changes small when the existing theme still fits, so upgrades remain manageable; build your own theme when its core structure needs replacing. Consider leaving the theme system when Online Store itself can no longer support the storefront you need.
References
The Shopify documentation cited in this article is listed below. Check the official pages for current plan restrictions and platform capabilities.
- Shopify Build themes
- Shopify Theme architecture
- Shopify Building with sections and blocks
- Shopify Theme settings
- Shopify Theme app extensions
- Shopify Updating themes
- Shopify Version control for themes
- Shopify GitHub integration for themes
- Shopify Theme Check
- Shopify Performance best practices for themes
- Shopify Custom storefronts
- Shopify Checkout app extensions
- Shopify Theme editor
Adapted from the Manus AI draft supplied by the user. Figures 1 and 4 are the Shopify illustration and screenshot included in that draft. Figures 2 and 3 are English versions of the supplied diagrams. All four images are hosted locally.
Mttao GitHub ↗
Exploring technology and life's wisdom