adspower · · 19 min read
AdsPower User Guide: Anti-Fingerprint Browser Tutorial
Complete AdsPower anti-fingerprint browser guide covering account setup, proxy settings, team collaboration, RPA automation and core features. Learn multi-account management techniques to boost social media and e-commerce efficiency while avoiding account bans.
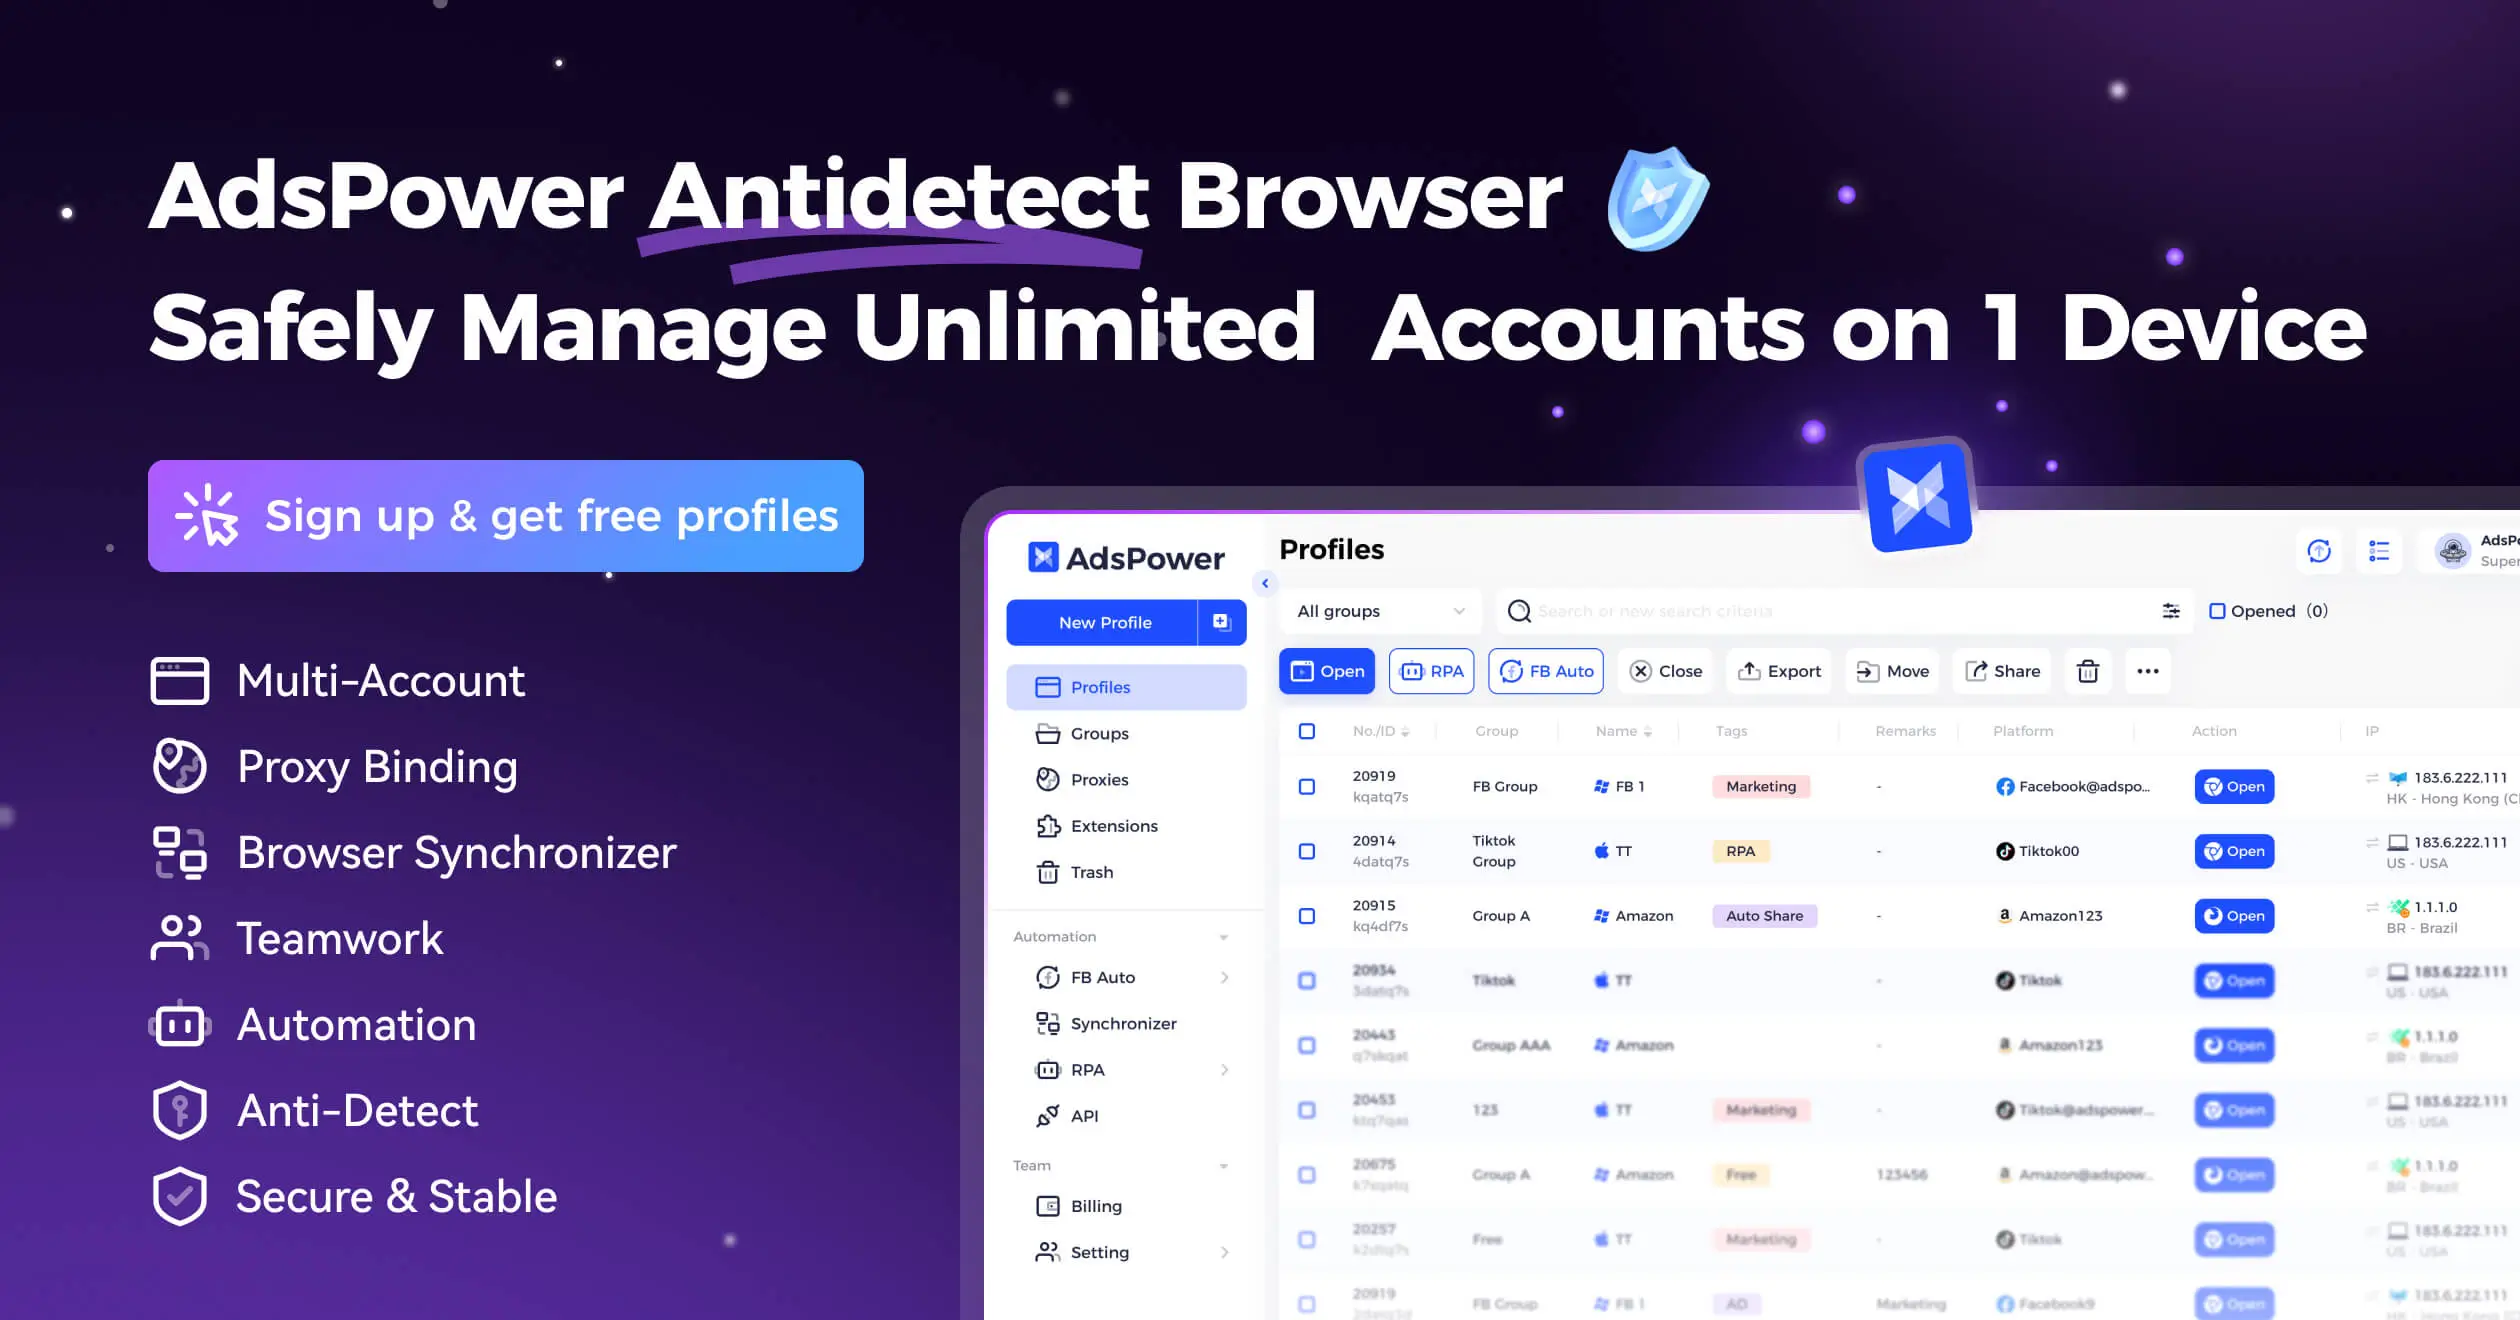
This article explains how to use AdsPower effectively to improve your social media account management efficiency.
AdsPower Basics
Understanding AdsPower’s core concepts helps you grasp what problem AdsPower solves before diving into the software operations.
AdsPower and Anti-Fingerprint Technology
Major platforms like Facebook, Google, and Amazon use advanced detection systems that can identify and ban users who operate multiple accounts on a single device. This detection works by tracking each user’s digital fingerprint.
AdsPower provides a complete solution to this challenge. It’s an anti-fingerprint browser that creates separate, isolated browser environments for each account. Each environment has a unique browser fingerprint that looks like a real user device, making each profile appear as a completely independent real user to websites.
Key Terms
Browser Fingerprint This is a collection of information that websites can gather about your device and browser. AdsPower can customize over 20 fingerprint parameters including:
- Time zone
- WebRTC
- Location
- Language
- User Agent
- Fonts
- Screen resolution
- Canvas fingerprint
- WebGL metadata
This customization ability is the core of its anti-fingerprint technology. AdsPower’s value isn’t in “hiding” fingerprints, but in creating new, real, and consistent fingerprints for each profile.
Unlike solutions that try to hide or block fingerprint tracking (which can be seen as suspicious behavior), AdsPower collects real fingerprint variables and generates unique, reliable fingerprints based on them. This makes each profile act like a trusted independent online user. AdsPower’s unique anti-fingerprint approach is key to stable, secure multi-account management.
Proxy : A proxy hides your real IP address, which is a key part of your digital fingerprint.
AdsPower doesn’t provide or sell proxy IPs directly, but it works seamlessly with various proxy services. You need to get proxy services from third-party providers, then configure them in AdsPower to assign each browser profile a separate IP address.
SunBrowser and FlowerBrowser : AdsPower offers two browser engines to match different user habits and workflows:
- SunBrowser: Based on Chromium (Google Chrome) engine, highly compatible, suitable for most users
- FlowerBrowser: Based on Firefox engine, for users who need a specific Firefox environment
AdsPower Installation and Account Setup
System Requirements
Before installing AdsPower, make sure your device meets these minimum system requirements. Note that newer browser engine versions require higher operating system versions. For example, SunBrowser based on Chromium 111 and higher needs Windows 10 or macOS 10.13 and above.
Hardware Requirements:
- Memory (RAM): At least 2 GB
- Available Disk Space: At least 2 GB
- Processor (CPU): Dual-core or higher performance processor
Supported Operating Systems:
- Windows: Windows 7 and higher, Windows Server 2008 and higher
- macOS: macOS 10.13 and higher, supports Intel and Apple Silicon (M1/M2) chips
- Linux: Ubuntu 22.04 and higher
Client Download and Installation
- Download Client: Visit AdsPower official website download page
- Choose Version: Select and download the appropriate installation file for your operating system (Windows, macOS, or Linux)
- Install:
- Windows users: Double-click the downloaded
.exefile, follow the installation wizard prompts, agree to the license agreement and complete installation. The program will start automatically after installation - macOS users: Open the downloaded
.dmgfile, drag the AdsPower icon to the “Applications” folder. On first launch, if the system shows a security warning, go to “System Preferences” → “Security & Privacy” → “General” to allow the app to run - Linux users: Use terminal commands (like
sudo dpkg -i) to install the downloaded.debpackage
- Windows users: Double-click the downloaded
Account Registration and Activation
-
Register Account: Open the AdsPower client or visit the official registration page, click “Register”. You can register using an email address and need to verify your email with a verification code. AdsPower also supports quick registration through Google, Facebook, or VK accounts.
-
Activate Free Plan and Trial: After successful registration, your account automatically activates a permanent free plan. The free plan includes at least 2-5 free profiles. All new users can also activate a 3-day free trial of premium features to fully experience advanced functions like Local API and more profiles before paying.
AdsPower Interface Overview
AdsPower’s interface is powerful but information-dense. First-time users might find the interface elements overwhelming and complex. This section will guide you to quickly familiarize yourself with the software layout and master the distribution of core functional areas to reduce the learning curve.
First Login and Main Panel
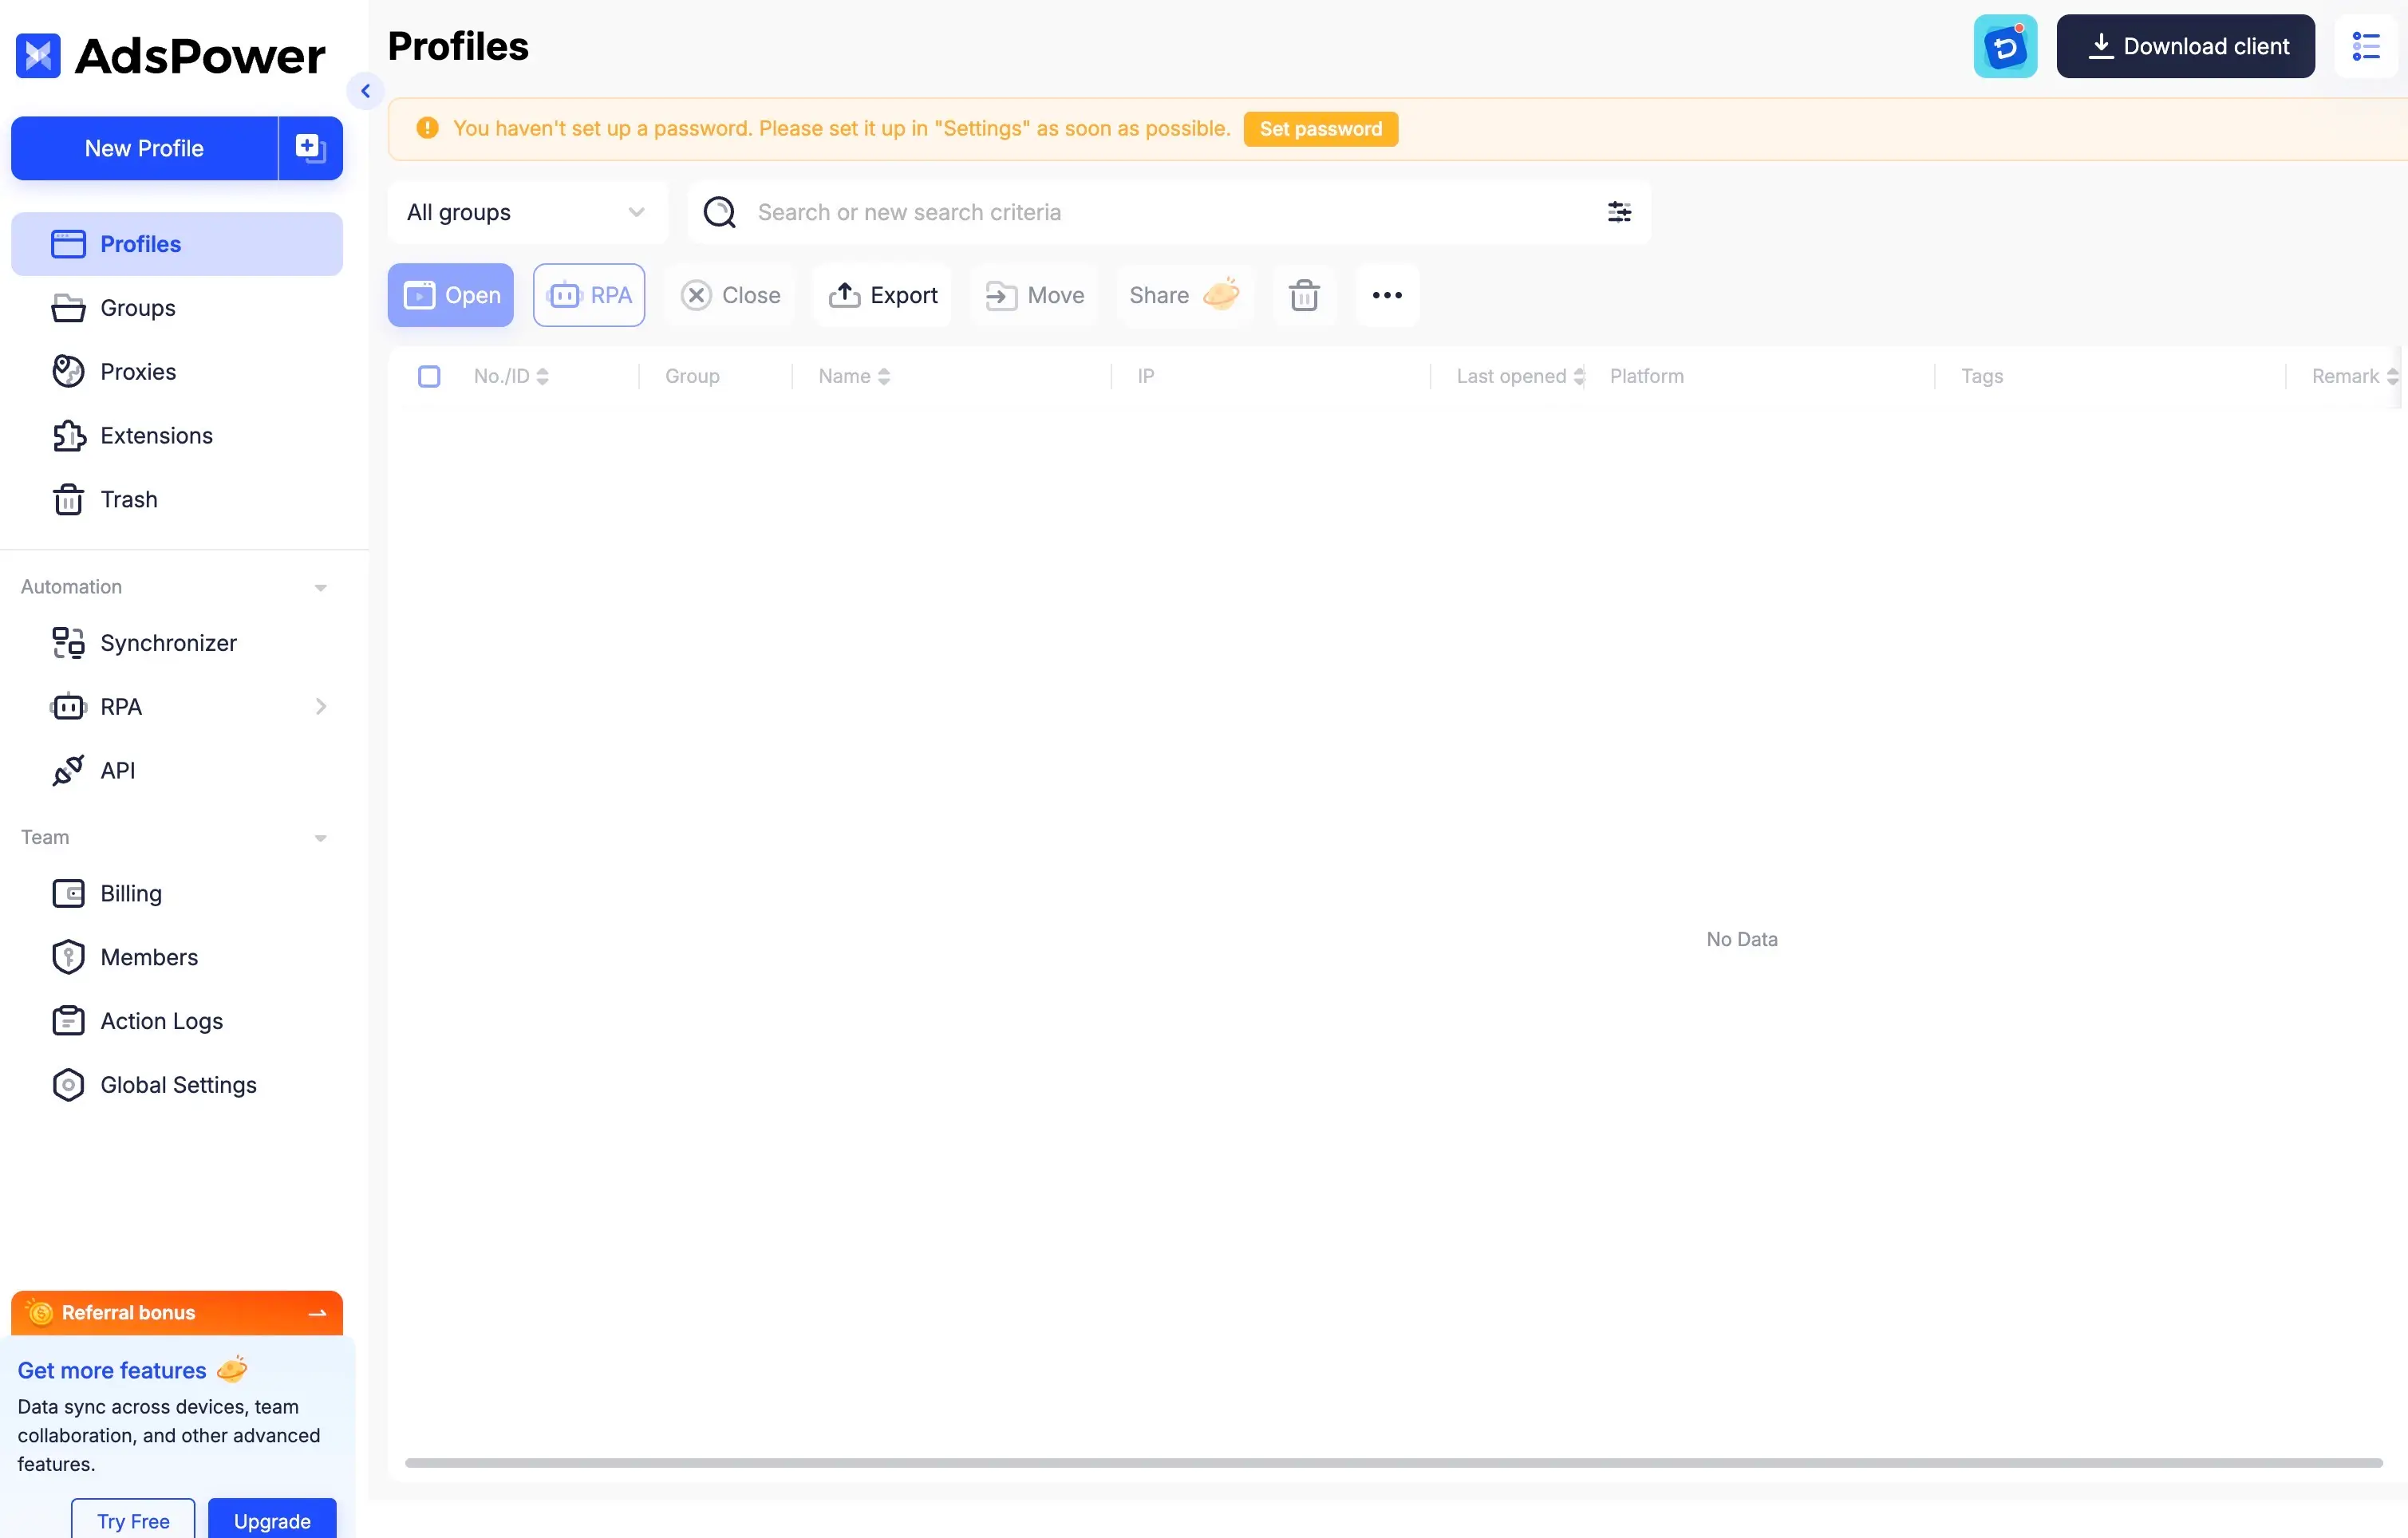
When you first log into AdsPower, you’ll see the software’s main interface. The center shows the profile list, displaying all your created browser profiles. Above the list are buttons for batch operations like “Open” and “New Profile”.
Main Menu Navigation
The left side has a collapsible main navigation menu - this is the entry point for all core functions. To save screen space, you can click the button at the top of the menu to minimize it to an icon bar.
- Profile Management: This is your most-used area for creating, managing, grouping, and searching all browser profiles
- Proxies: For adding, managing, and testing your proxy IP configurations
- Team: If you use a team plan, this is where you add team members, assign permissions, and monitor operation logs
- Automation (RPA): The center for managing RPA (Robotic Process Automation) bots and related automation tasks
- App Center: May contain recommended tools or extensions
- Settings: For global application settings like data sync options, local API settings, etc.
- Help Center & Support: Provides quick links to official documentation, video tutorials, and online customer service
AdsPower Core Operations: Profile and Proxy Management
This section breaks down the most basic and critical daily workflows for users.
Creating and Configuring Browser Profiles
In AdsPower, each “profile” represents an independent browser environment. Properly configuring these files is the foundation for successful multi-account management.
Creating a Single Profile
Click the ”+ New Profile” button in the top left of the main interface to open a detailed configuration window. Here’s a detailed explanation of each configuration item:
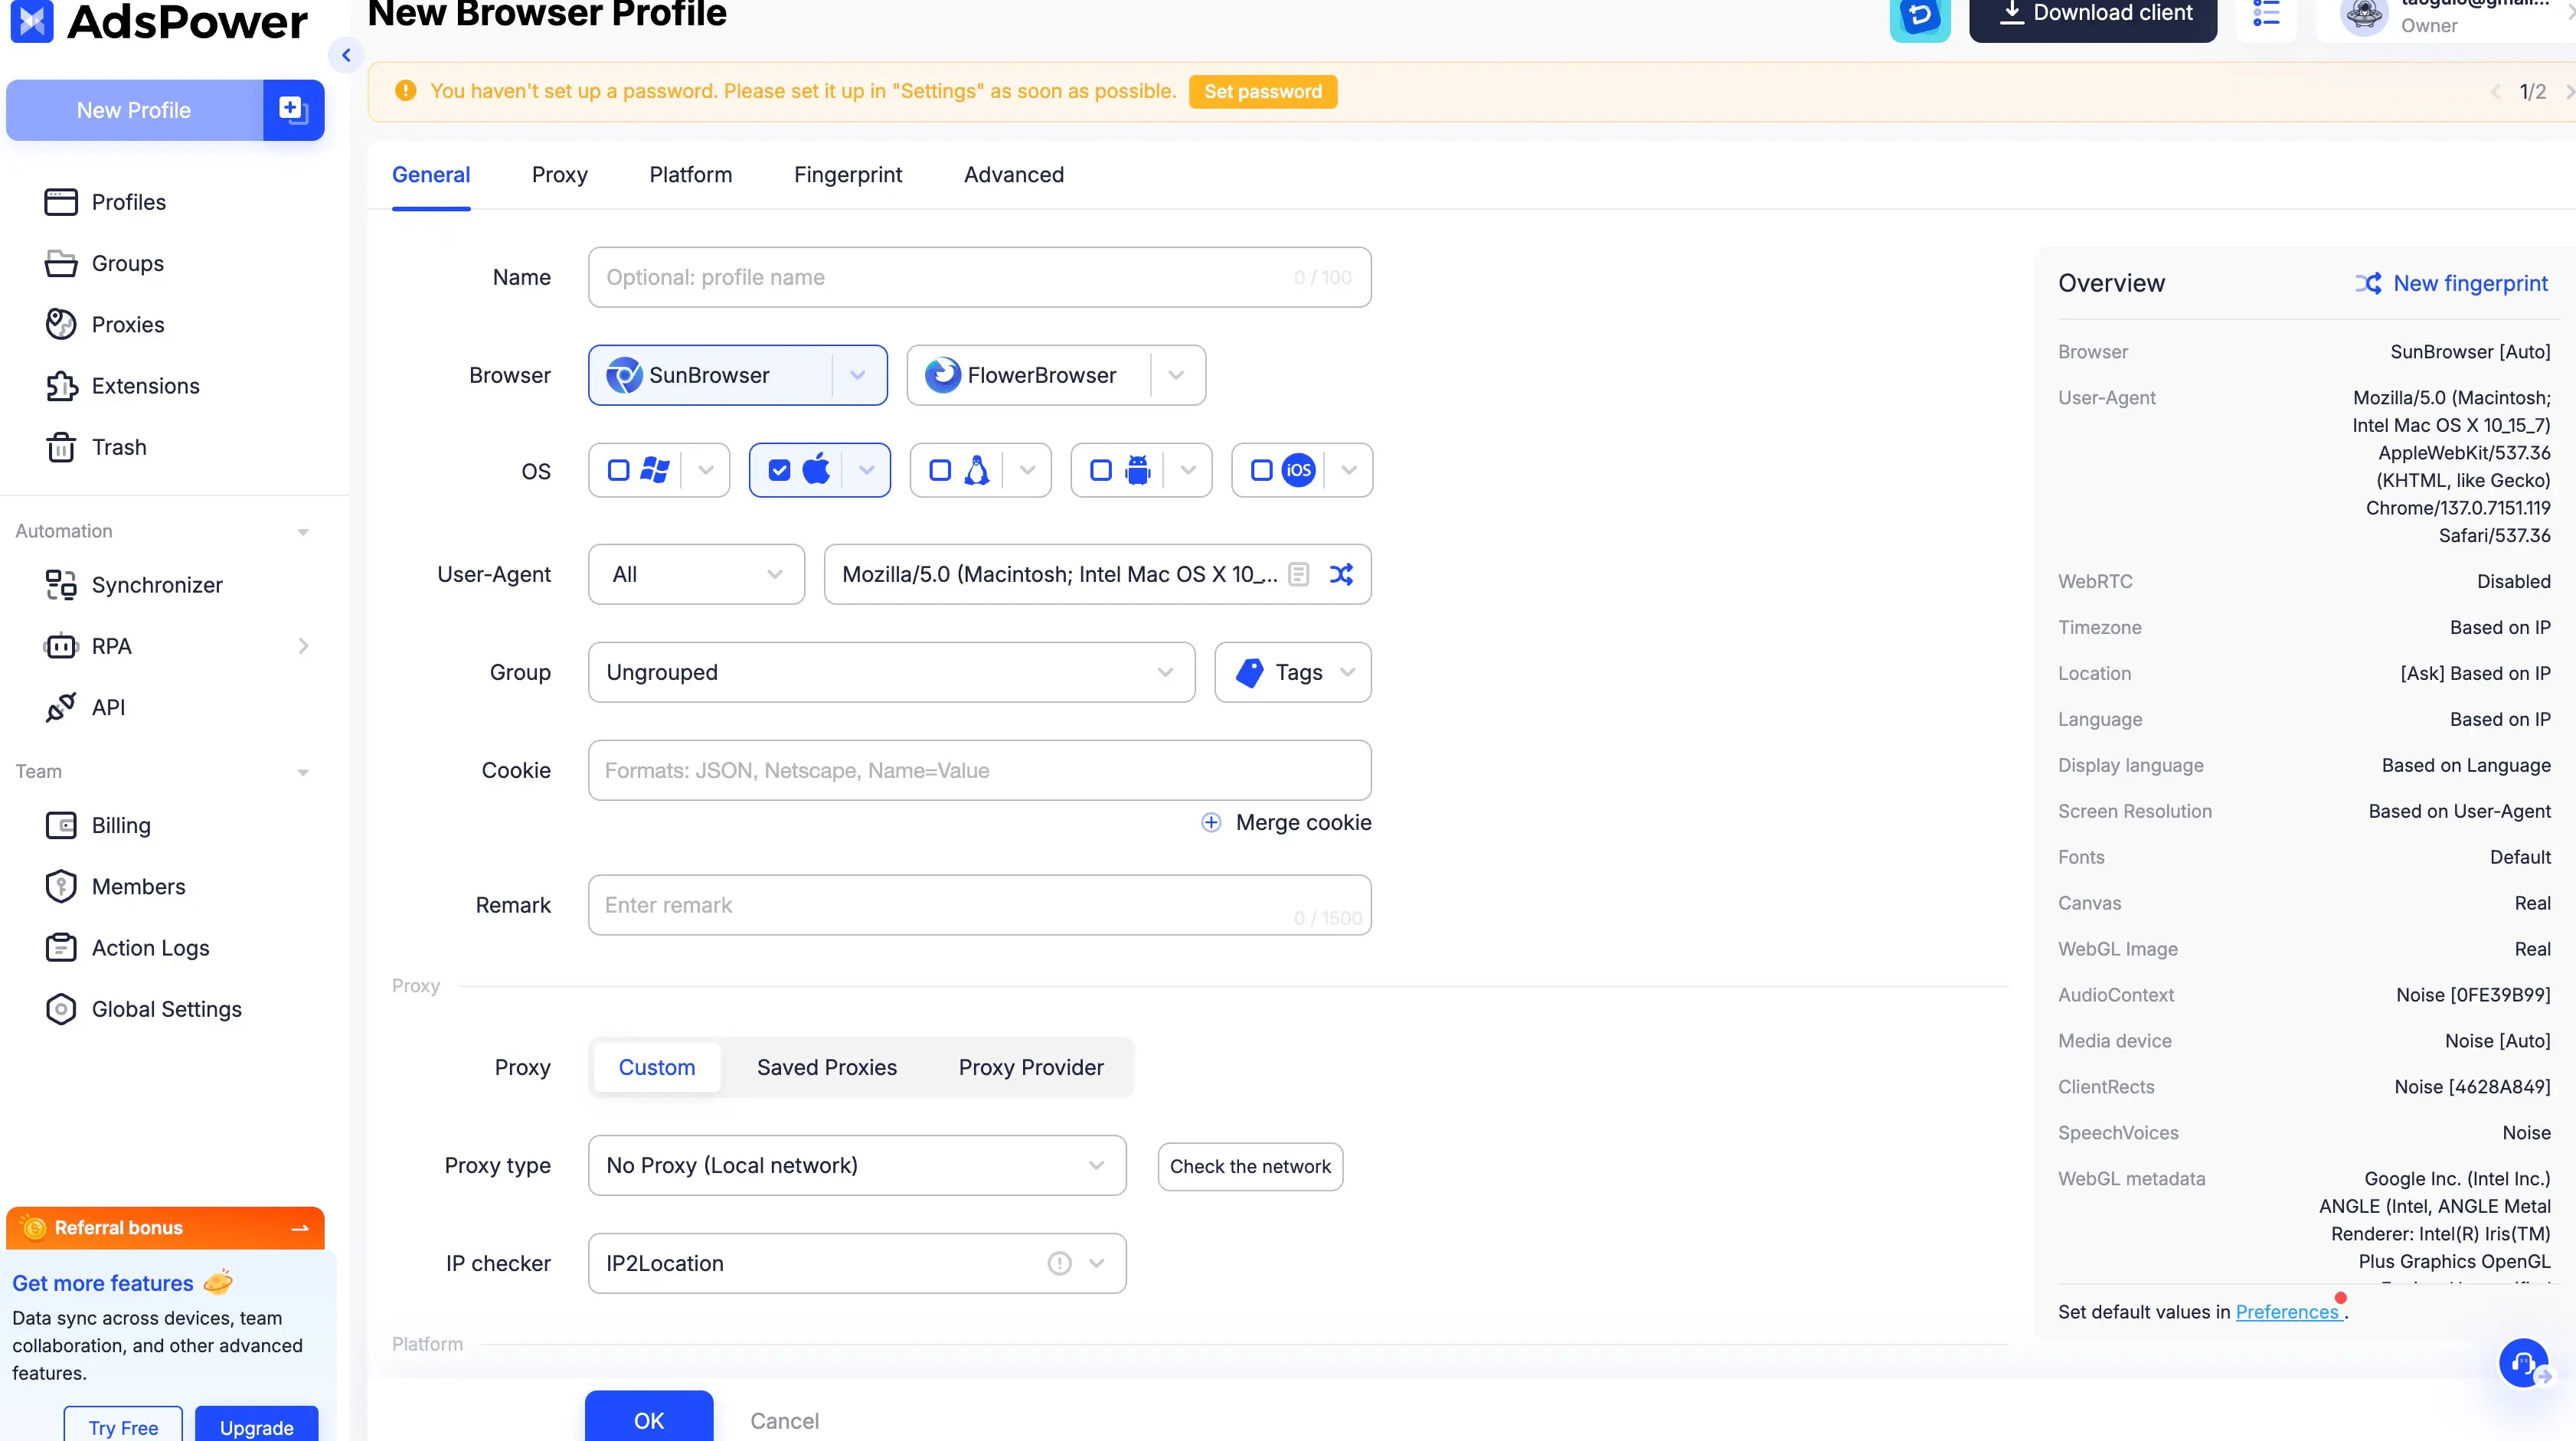
General Tab
- Name, Group, Tags: Name your profile and assign it to a specific group or add tags for easy organization and filtering
- Browser: Choose SunBrowser (Chrome engine) or FlowerBrowser (Firefox engine)
- Operating System & User Agent: Choose the operating system to simulate and match it with the appropriate user agent string. Keeping these two consistent is crucial for building a believable fingerprint
- Cookies: You can paste pre-prepared cookies here (supports JSON, Netscape formats). This is useful for quick account login or restoring previous session states
Proxy Tab
This tab is for configuring independent proxy IPs for the profile. Detailed configuration methods will be covered in the proxy settings section. You can choose “Custom” to manually enter proxy information or select from saved proxy lists.
Platform Tab
You can select specific platforms (like Facebook, Amazon) here and pre-fill login usernames and passwords. When you start this profile, it will automatically open that platform’s login page and fill in the information for one-click login.
Fingerprint Tab
By default, AdsPower automatically generates a complete set of random browser fingerprints for each new profile. You can view this fingerprint information in the “Overview” on the right side of the window. If you need to regenerate, click the “New Fingerprint” button. Advanced users can click “Preferences” for more detailed fingerprint parameter customization. There’s also a “Random Fingerprint” feature that randomly generates fingerprint parameters each time the browser starts - this is a paid feature.
Browser Settings Tab
This contains advanced browser behavior settings specific to individual profiles, such as whether to enable plugins, sync settings, etc.
After completing all configurations, click “OK” to create the profile.
Advanced Profile Management Tips
When you need to manage more accounts, efficient batch management becomes very important.
Batch Creating Profiles
AdsPower provides two efficient batch creation methods:
-
Batch Import: This feature lets you create hundreds or thousands of profiles at once using a preset Excel or TXT template. You can pre-fill each profile’s name, proxy information, cookies, startup URL, and other information in the template file, then upload it. AdsPower will automatically generate all profiles for you. Batch creation requires upgrading to a paid plan.
-
Quick Create: If you need to quickly generate a batch of blank profiles with the same configuration (for example, to assign to team members for their own configuration), you can use this feature. You just specify the creation quantity and some basic settings (like whether user agents are random or fixed), and AdsPower will generate the corresponding number of “clean” profiles without platform login information or cookies.
Efficient Organization and Filtering
- Groups: By creating different groups, you can logically separate profiles by project, client, platform, or purpose for more organized management
- Tags: Tags provide more flexible filtering dimensions than groups. You can add multiple tags to one profile for quick cross-group search and filtering
Batch Editing and Operations
AdsPower supports performing operations on multiple profiles simultaneously, greatly improving work efficiency. In the profile list, you can check multiple profiles, then use the toolbar buttons at the top for batch operations like batch open, close, share, delete, or run the same RPA task on all selected profiles.
A particularly powerful feature is batch updating profile information. The process is:
- Select multiple profiles you want to modify in the list
- Click the “Export” button in the toolbar to export these profiles’ information as an Excel file
- Open the file locally with Excel, modify the information you need to change (like names, notes, proxies), but don’t delete or modify the ACC_ID and ID columns
- Save the modified Excel file
- Return to AdsPower, click the “Update Profiles” button in the toolbar, upload your modified Excel file
- Refresh the list and you’ll see all changes have been successfully applied
AdsPower Proxy Integration
Proxy configuration is one of the most technical and error-prone aspects of multi-account management. Some users report this process isn’t easy for beginners. This section provides a very clear, detailed guide to help you successfully complete proxy integration.
Why You Must Use Proxies
It’s important to emphasize again that equipping each browser profile with an independent, clean proxy IP is necessary to avoid accounts being banned due to association. If multiple accounts use the same IP address to log in, platforms can easily associate them and cause bans.
Proxy Sources
AdsPower doesn’t sell proxies itself - it’s a platform that integrates with proxy services. You need to purchase proxy services from third-party proxy providers. AdsPower provides recommended links or partnership entries for some mainstream proxy providers (like Oxylabs, BrightData, IPIdea, TabProxy) in the software for user convenience. You can also find more partner proxy provider information in the “Proxy Directory” on AdsPower’s official website.
Adding and Managing Proxies
Setting Proxies in Individual Profiles
- In the create or edit profile window, switch to the “Proxy” tab
- Select proxy type (HTTP, HTTPS, or SOCKS5) - this depends on what protocols your proxy provider supports
- In the “Host:Port” field, paste your proxy information in the format
IP:Port:Username:PasswordorHost:Port:Username:Password. Usually, when you paste complete information, the fields below will auto-fill. This information (host, port, username, password) is all provided by your proxy provider - Click the “Check Proxy” button to test if the proxy can connect successfully. If it shows “Connection test passed”, the configuration is successful
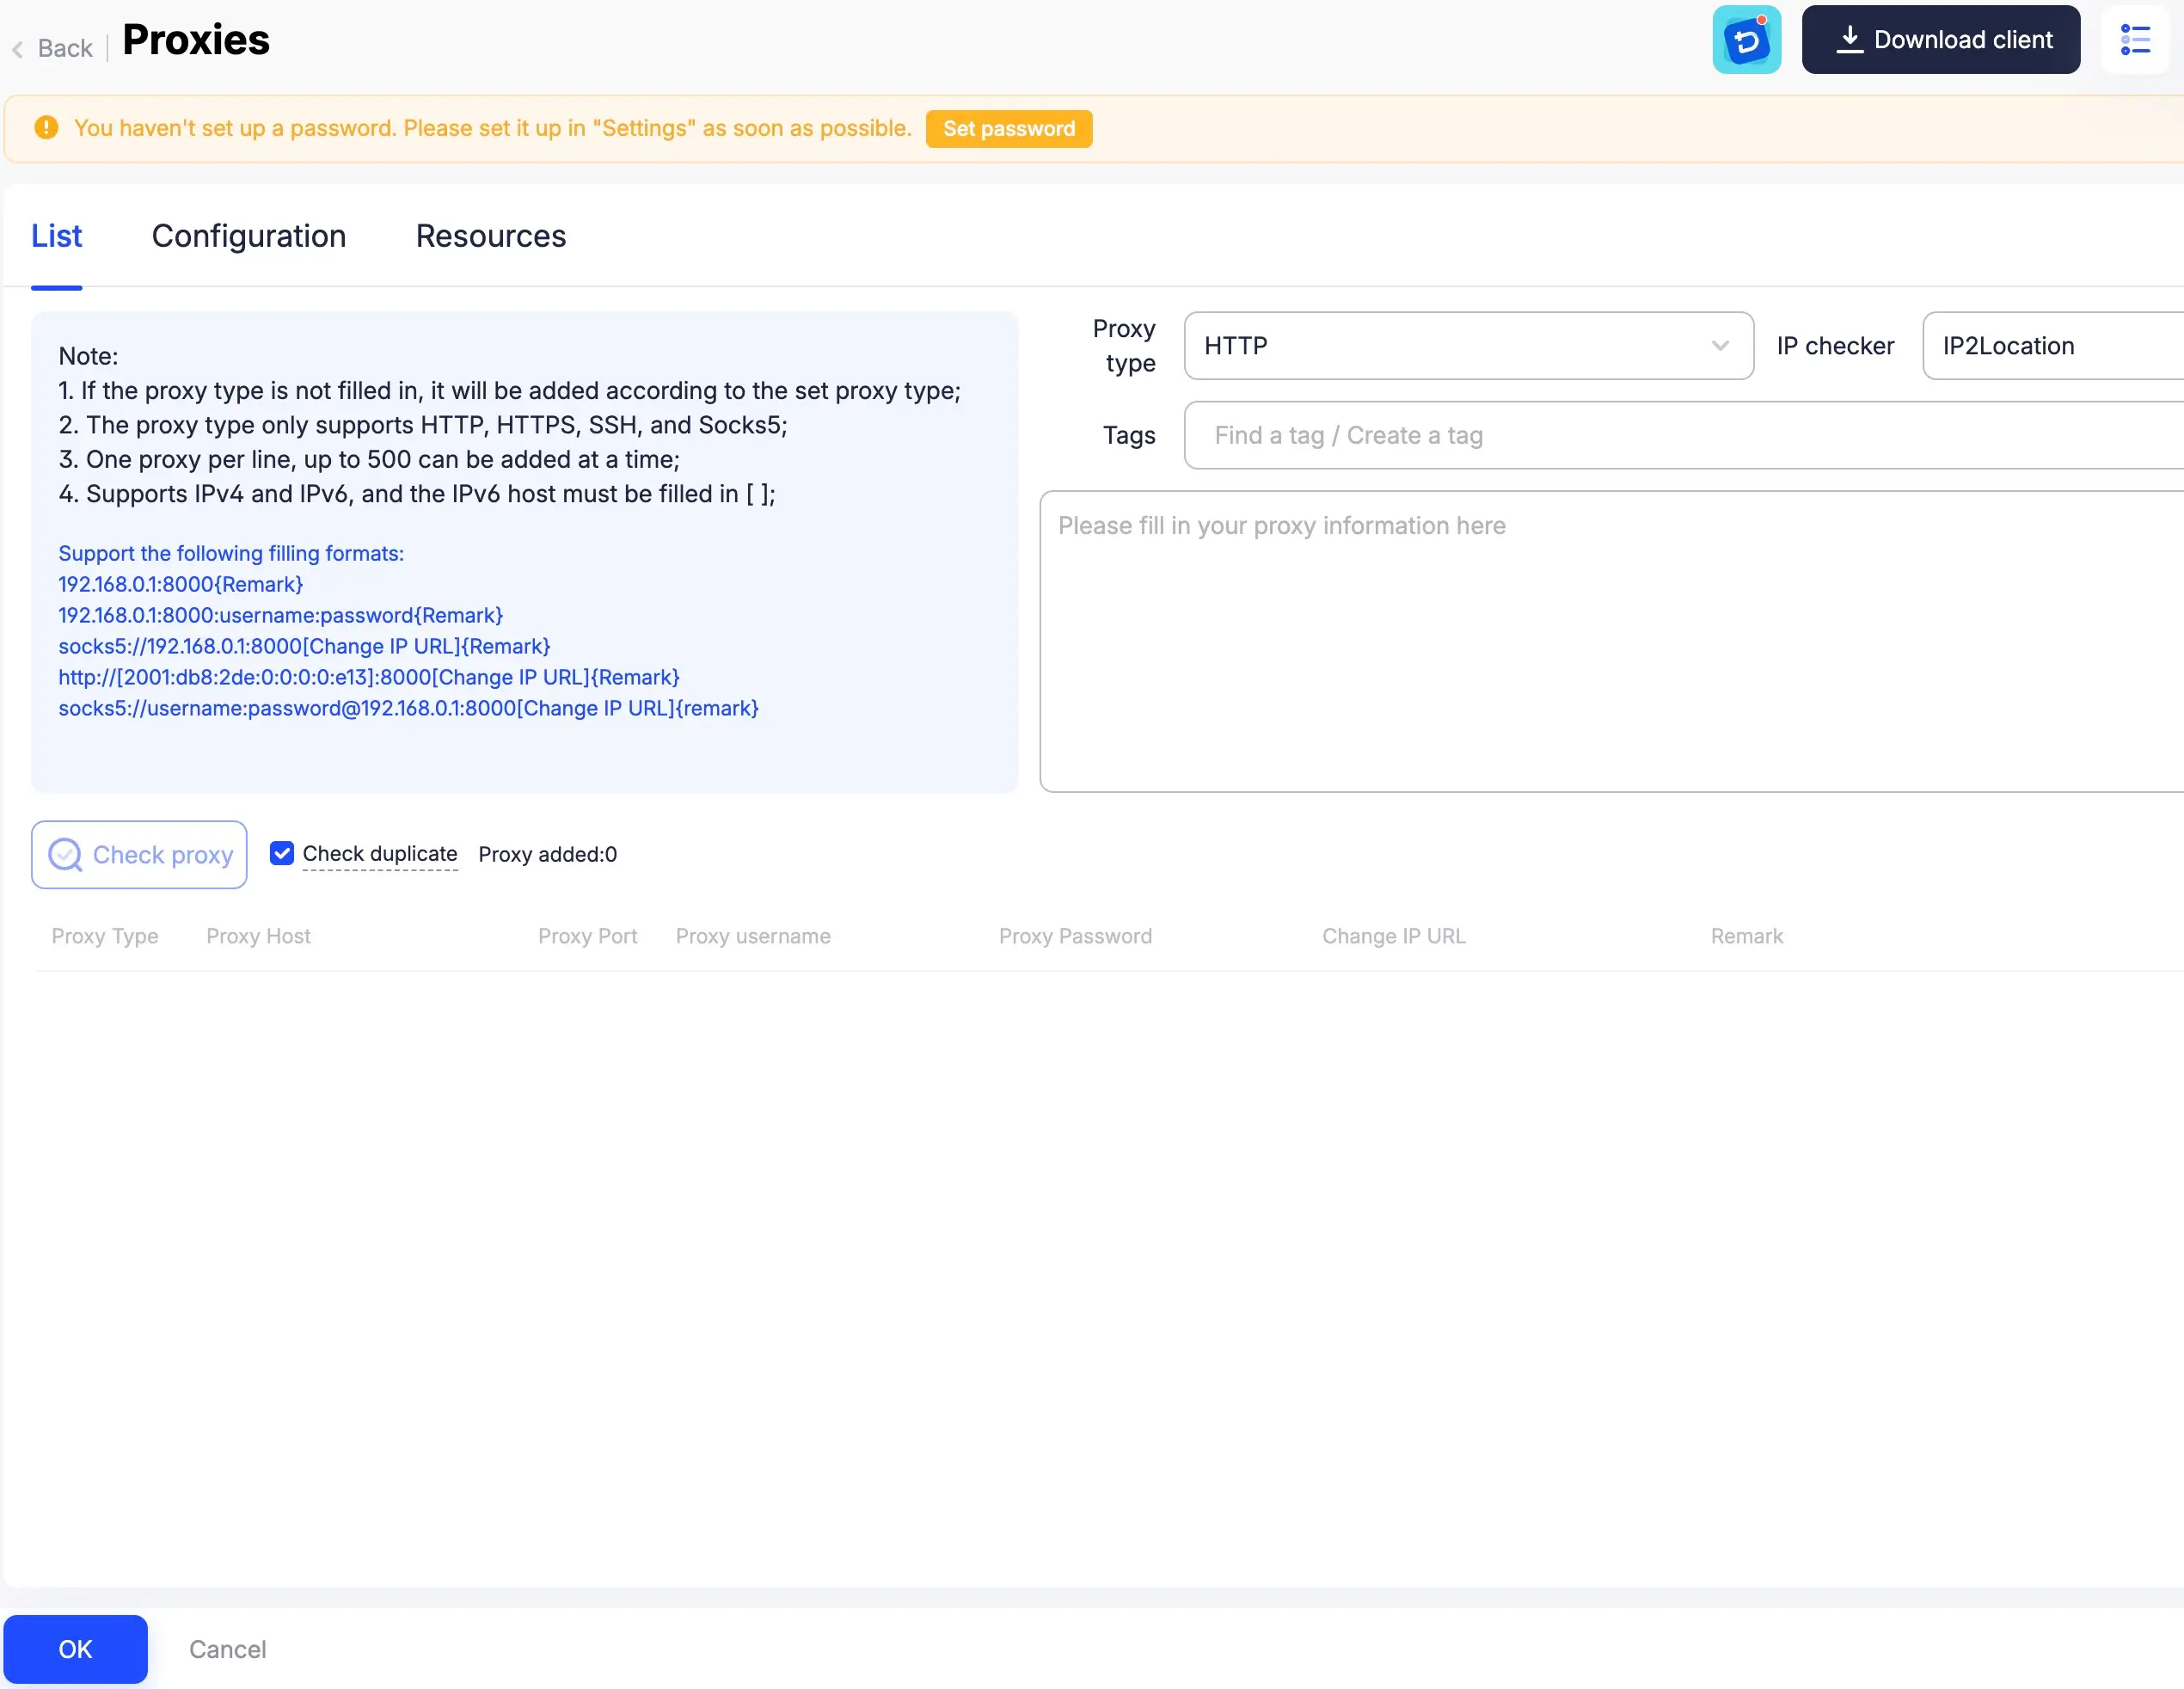
Batch Managing Proxies
- Click “Proxies” in the left main menu to enter the proxy management center
- Click the “Add Proxy” button. You can paste multiple proxy information lines at once (one per line), up to 500 proxies simultaneously
- In the proxy list, you can manage all proxies including batch checking their connectivity, editing, or deleting
Verification and Assignment
Status Check: In the proxy management list, the “Outbound IP” column uses color codes to show proxy status:
- 🟢 Green: Proxy available and connection test passed
- 🔴 Red: Proxy unavailable, connection failed
- ⚪ Gray: Proxy not yet checked
Assigning Proxies: When creating or editing profiles, you can click “Saved Proxies” to select an added proxy from your proxy list for assignment. AdsPower also supports random proxy assignment, which can be configured in the proxy management center settings.
AdsPower Automation and Efficiency Tools
After mastering core account configuration, this section introduces AdsPower’s powerful automation tools that can greatly save your time and improve return on investment.
Using RPA for Task Automation
RPA (Robotic Process Automation) is one of AdsPower’s most powerful but also most technical features. It lets users create a “robot” to simulate human repetitive operations in browsers like clicking, typing, scrolling pages, etc., to automate workflows.
Starting with RPA Market: Using Preset Templates
For most users, the simplest and quickest way to get started with RPA is using preset templates provided in the official market.
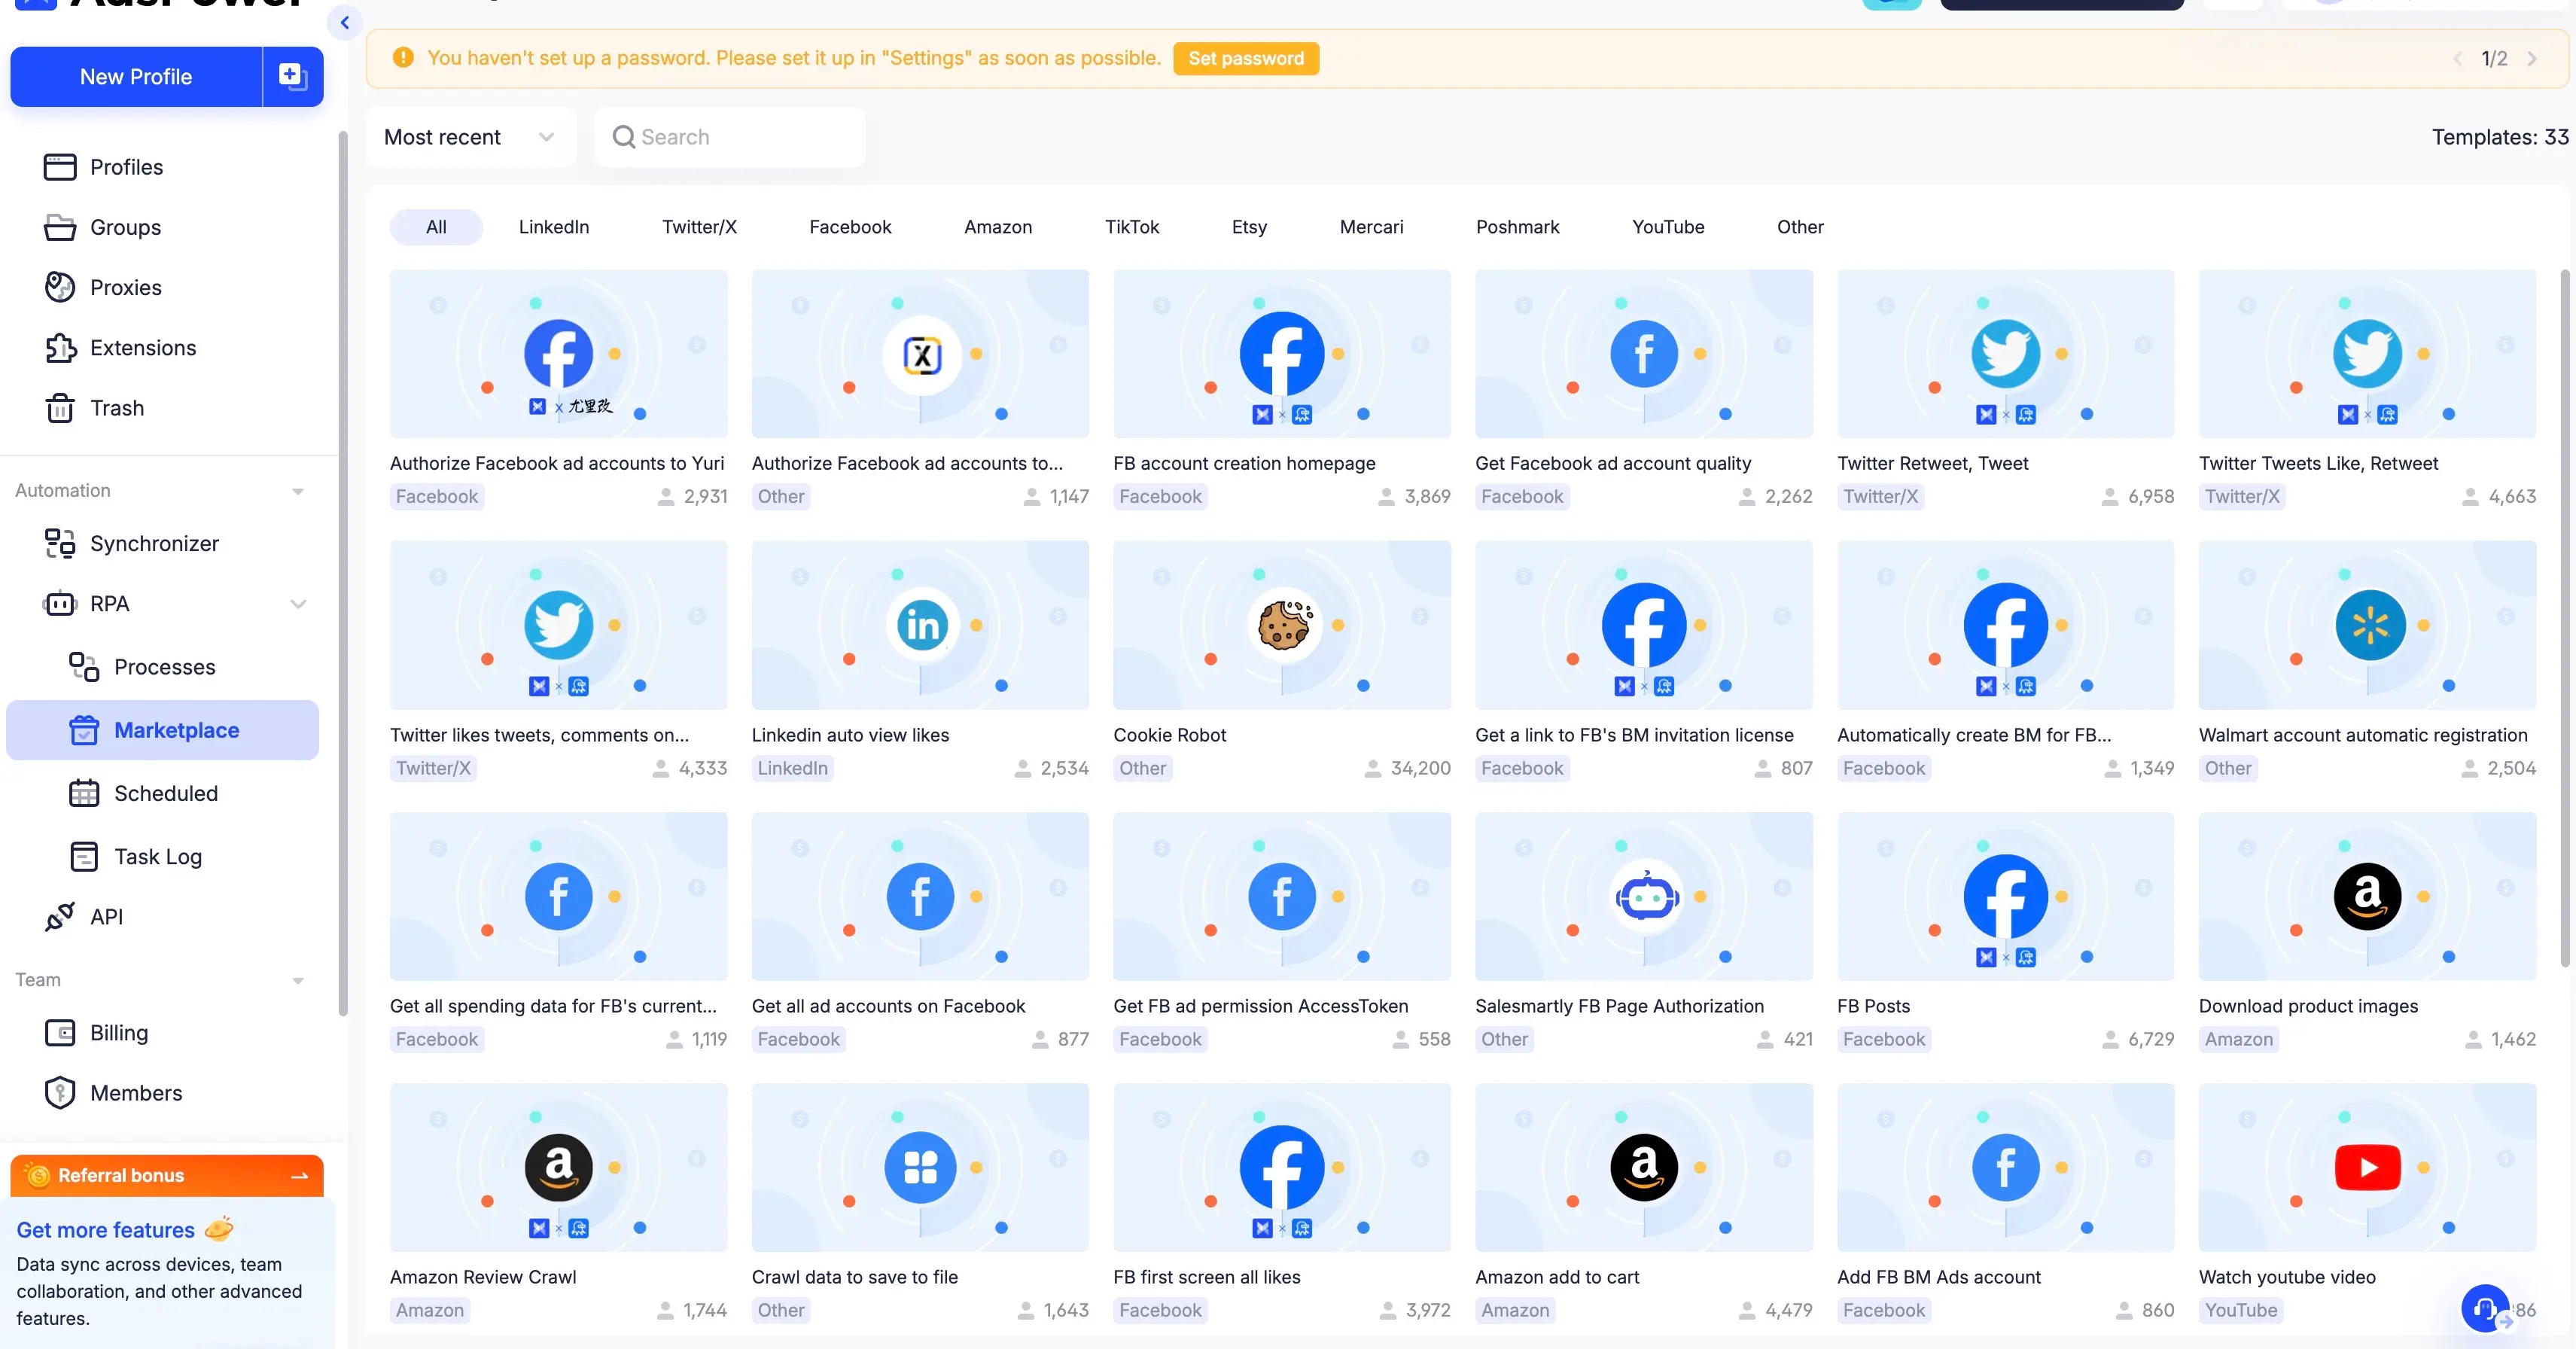
-
Browse Market: In the AdsPower client, go to “Automation” → “RPA” → “Market” to see automation templates designed for different platforms (like Facebook, Amazon, Twitter)
-
Select and Apply Templates: For example, you can find a template for “Amazon Add to Cart” commonly used for new account “warming up” operations. Click to apply the template and it will appear in your “Processes” list
-
Run Tasks:
- Return to the “Profile Management” list, select one or more profiles you want to execute this task on
- Click the “RPA” button at the top
- In the popup window, select your just-applied “Amazon Add to Cart” process
- Set task type: “Normal Task” means execute immediately, “Scheduled Task” can be set to run at specific future times or on cycles
- Click “OK” and the RPA robot will start automatically executing operations in the selected profiles
Advanced: Creating Custom RPA Processes
Although AdsPower’s RPA is marketed as “no-code”, creating complex custom processes still requires some technical background and logical thinking. This is usually considered an advanced user feature.
The basic idea for creating custom processes is to build a task flow in a visual editor by dragging and configuring different “operation steps”. These steps include:
- Web Operations: Like opening URLs, clicking elements, entering text, extracting data
- Keyboard Operations: Simulating keyboard input
- Logic Control: Like setting loops (For Loop), conditional statements (If)
- Data Processing: Importing data from Excel or Txt files, or exporting extracted data
Due to its complexity, beginners should start by modifying existing templates to gradually understand how they work, then try creating from scratch. The official RPA User Guide provides more detailed operation instructions.
Monitoring and Permissions
- Task Log: All RPA task execution results can be viewed in “Task Log”, including successful, failed, or canceled tasks, plus detailed error information
- Permission Management: Administrators can assign different RPA operation permissions to team members, like whether they can create, edit, or delete RPA processes
Synchronizer: One Operation, Multi-Window Sync
The Synchronizer is an intuitive and efficient tool that can mirror all your operations in one main browser window (including mouse clicks, page scrolling, keyboard input) in real-time to multiple other open browser windows.
Usage Guide
Using the Synchronizer is very simple - just three steps:
- Open multiple browser profiles in AdsPower that you want to synchronize operations for
- Click the “Synchronizer” button in the client interface
- In the popup synchronizer control panel, select one window as the “master window” - other windows automatically become “slave windows”. Then click “Start Sync”
After this, all your operations in the master window will be copied in real-time to all slave windows.
Use Cases and Important Considerations
Typical Synchronizer use cases include:
- Posting the same content simultaneously across 10 social media accounts
- Filling the same registration information in multiple e-commerce platform stores
- Performing unified initial settings for a batch of new accounts
⚠️ Important Warning: You must be aware of an important risk when using the Synchronizer. While it greatly improves efficiency, completely identical, completely synchronized operation patterns can easily be identified as bot behavior by platform risk control systems, leading to batch account bans. Therefore, it’s recommended to mainly use the Synchronizer for low-risk operations like account initial setup. For “account warming” and other scenarios that need to simulate real user behavior, use cautiously, or use RPA’s delay functions to introduce randomness and avoid leaving obvious machine operation traces.
Using Local API for Custom Development
💡 Note: This chapter is for advanced users with programming or scripting abilities.
Local API provides developers with the ability to control AdsPower browsers through code. It lets you combine AdsPower with mainstream automation frameworks (like Selenium, Puppeteer) to achieve more complex, customized automation workflows.
Main Features
- Enable API: In AdsPower’s “Settings” → “Local API”, you can enable this feature and get your exclusive API key
- Headless Mode: AdsPower supports running in headless mode (without showing graphical user interface). This is useful for deploying automation scripts on servers
- Main Functions: Through the API, you can achieve operations like programmatically starting and closing browsers, creating and updating profiles, dynamically configuring fingerprint parameters
- Documentation: AdsPower provides detailed API documentation including all available interfaces, parameter descriptions, and code examples - essential reference for developers during integration
Team Collaboration and Security
This section focuses on features designed for agencies and multi-member enterprises - crucial for asset security and collaboration efficiency.
Efficiently Managing Your Team
For teams, using password spreadsheets or instant messaging tools to share accounts is extremely dangerous. This not only easily leads to password leaks, but also creates huge security risks for account handover when employees leave. AdsPower’s team collaboration features aim to solve these problems fundamentally.
Core Features
-
Adding and Organizing Members: Super administrators can add new team members in “Team” → “Members” menu and create different member groups for easier management
-
Fine-grained Permission Management: This is the core of team features. Administrators can assign very detailed operation permissions to each member or member group. For example, you can control whether a member:
- Can only access which profile groups
- Has permission to create, delete, or share profiles
- Can use RPA or Synchronizer features
- Has permission to view platform login passwords for accounts
-
Secure Profile Sharing: You can share profile operation permissions with team members without revealing the real login passwords for platform accounts in those profiles. Members can directly open and use authorized profiles but cannot see passwords
-
Operation Log Monitoring: For security and accountability, AdsPower records every important operation by all members. Administrators can view detailed records in “Operation Log”, including who logged into the system at what time with which IP, and all operations performed on profiles, proxies, RPA (create, modify, delete). This provides strong support for tracking suspicious activities and auditing workflows
Security Best Practices
AdsPower provides a solid security foundation, but user operation habits also determine final account security.
Software’s Own Security Mechanisms
Data Security : AdsPower uses end-to-end encryption for transmitting and storing all profile data. By default, all your browsing data is stored locally on your device and won’t sync to the cloud without your permission.
Login Security : It’s strongly recommended that all users enable two-factor authentication (2FA). AdsPower supports standard TOTP 2FA and provides a browser extension called “AdsPower Authenticator” to help manage verification codes. The system also provides login failure alerts and abnormal login blocking features.
Extension Security : To prevent risks from malicious browser extensions, extension programs recommended in AdsPower’s app center are pulled directly from the official Chrome Web Store, ensuring source security and latest versions.
Core Principles for Avoiding Account Bans
Based on AdsPower’s official blog and industry experience, following these principles can minimize account ban risks:
- Strict Isolation: Stick to the principle of “one profile, one independent proxy, one platform account”
- Slow “Account Warming”: For newly registered platform accounts, don’t immediately perform heavy commercial operations. Use RPA or manual operations to simulate real users browsing, liking, posting for a period of “warm-up” behavior
- High-Quality Proxies: Use high-quality, clean residential or mobile proxy IPs. Avoid datacenter IPs as they’re more easily identified and flagged by platforms
- Geographic Location Matching: Ensure your proxy IP’s geographic location matches the country or region declared in your account profile
- Avoid Bot Behavior: Avoid performing completely identical, completely synchronized repetitive operations across multiple accounts. If using the Synchronizer, use mainly for one-time setup and consider using RPA’s random delay features to add naturalness to operations
AdsPower Common Issues and Troubleshooting
This section provides reference and solutions for problems you might encounter while using AdsPower.
Common Problems and Solutions
This section is organized in Q&A format to help you quickly locate and solve common problems.
Profile Startup Errors
Problem: When starting a profile, you get Error 100044: Waiting for browser to start timeout, please wait.
Possible Causes: Insufficient system resources, network delays, or corrupted browser engine files.
Solutions:
- Try restarting the AdsPower client and your computer
- Check your network connection
- If the problem persists, try redownloading the browser engine in “Settings”
Problem: Error message Error 100001: Failed to start browser.
Possible Causes: Similar to error 100044, usually related to system environment or engine files.
Solutions:
- Follow the solutions for error 100044
- Also check if antivirus software or firewall is blocking AdsPower’s normal operation
Problem: Error message The disk space where the cache is located is not enough to open.
Possible Causes: The disk partition where AdsPower cache directory is located is full.
Solutions:
- Clean unnecessary files from that disk partition to free up space
- Or migrate the cache directory to another disk with sufficient space in AdsPower “Settings”
Problem: Error message Error: Upgrade to Windows 10 to use Chrome 110 kernel.
Possible Causes: Your current operating system version (like Windows 7) is too old and doesn’t support newer browser engines in AdsPower.
Solutions:
- Upgrade your operating system to Windows 10 or higher
- Or select an older browser engine version that your system supports when creating profiles
Proxy Connection Failures
Problem: “Check Proxy” shows authentication failure or connection error.
Possible Causes:
- Proxy credentials (IP, port, username, password) entered incorrectly
- Your device IP hasn’t been added to the proxy provider’s whitelist
- The proxy server itself has expired or failed
Solutions:
- Carefully verify and re-enter proxy information
- Log into your proxy provider’s backend to check IP whitelist settings
- Contact your proxy provider to confirm proxy status
Extension Problems
Problem: Extensions installed on one device disappear when logging into the same profile on another device.
Possible Causes:
- Data sync settings not enabled
- Or extensions were installed directly inside the profile rather than through AdsPower’s app center
Solutions:
- Ensure “Extension Data” sync is enabled in “Team” → “Global Settings” → “Data Sync”
- Always install extensions through AdsPower’s app center to ensure configurations can sync to the cloud
Problem: Extensions (especially wallet types) frequently require re-login.
Possible Causes:
- Browser cache was cleared
- Browser engine version had major upgrades/downgrades
- Data sync failed
Solutions:
- Avoid manually clearing cache
- Ensure consistent engine versions across multiple devices
- Check if data sync settings are normal
Local API Errors
Problem: API interfaces can’t be accessed, or return 502/503 errors.
Possible Causes:
- Network setting issues
- Firewall or security software blocking
- Proxy tool conflicts
Solutions:
- Try restarting your computer and only opening AdsPower for testing
- Temporarily disable security software and network proxy tools
- In API requests, try replacing the domain
local.adspower.netwith127.0.0.1orlocalhost
AdsPower Official Resources and Getting Help
When you encounter problems not covered above, you can get help through these official channels.
Self-Service Resources
- Help Center: This is the preferred place to get official detailed documentation and tutorials
- Official Blog: Regularly publishes guides, use case analyses, industry insights, and product updates
- Video Tutorials: AdsPower has official channels on platforms like YouTube providing many operation demonstration videos
- Community: Join official groups like Telegram to exchange experiences with other users
Contact Customer Service
- Email: You can contact the customer service team by sending email to
[email protected] - Online Chat: In the AdsPower client or official website, you can usually find online chat entry points - this is an effective way to get quick responses
💡 Tip: This guide covers AdsPower’s core features and usage methods. As the software continues to update, some specific operation steps may change. It’s recommended to regularly check the latest official documentation for current information.
Mttao GitHub ↗
Exploring technology and life's wisdom